
As we all know, Discord is vastly used worldwide as one of the leading platforms for communication. Mostly, gamers use it to play and stream their gamely, along with the other content creators showcasing their content on a server. You may also be a server owner and want to maintain its rules properly.
In that case, you may have to give some members a warning if they are not maintaining the rules. As it would be tough for you, you can give some trusted friends or members the ability to warn. If that is the case, you must have the proper idea about how to give people the ability to warn on Discord.
Why Is It Crucial to Warn Someone to Discord and Why You Should Give People the Ability to Warn
Unfortunately, only some of your server members always maintain the rules and regulations. Sometimes, those rules are broken both intentionally and unintentionally. At that moment, it is necessary to give those rule-breakers a warning regarding the mistakes they committed.
Otherwise, they will either remain unaware of their mistakes, or they won’t fear anymore while committing that same mistake. But, it becomes difficult when you have to maintain a large server consisting of a huge number of members. You might miss some rule-breaking incidents or end up warning the wrong person.
To avoid this type of unwanted situation, you can split this task among some members of your server. But don’t pick those members randomly from the list; try to go with the familiar and trusted ones. Once you give the ability to warn someone based on their mistakes, those chosen members can easily warn those people.
Thus, it will be easier to maintain all the members of your server and keep it active, along with being calm and peaceful.
How to Give People the Ability to Warn on Discord – The Steps to Complete the Task

Now, as you have made up your mind to give the ability to warn someone on Discord, you need to use a bot for the process. There are three different bots that you can use for this job, and those are Dyno Bot, MEE6, and Carl Bot. Among these three, using the Dyno Bot will be more sensible and useful.
So, despite learning how to warn someone on discord mee6 or how to warn someone on discord carl-bot, learn how to do it through Dyno Bot. Now, here are the steps or stairs to climb to get your desired job done:
Step-1: Visit Dyno Website to Add It to Your Server
As you try to complete the task through the Dyno Bot, you must add it to your server first. To do so, google Dyno Bot with any of your browsers, and from the shown results, enter the first link. It will direct you to the official website of the Dyno Bot, from where you can add it to your server.
For the process, you need to look for an option button named “Add to Server.” Click on that option immediately as soon as you locate it from the Dyno Bot website window. As you do so, it will direct you to the Discord login page and open Discord software simultaneously.
So, you must complete the usual tasks every time you log into your Discord account. As you do so, the server’s list will be in front of you, and among those, you need to select the desired server to which you want to add it. After choosing the server, there will be two options below: “Cancel” and “Continue.”
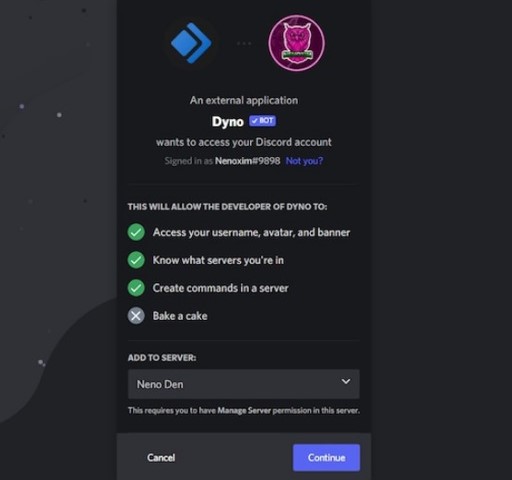
You need to click on the second option button for further proceedings. In the next phase, you will reach another new page which contains the list of permission that you give to your bot. Scroll down until you locate the “Authorize” button, and when you find it, click on it right away.
Thus, you will be able to add the Dyno Bot to your server to give the trusted members the ability to warn on Discord.
Step-2: Create A Moderator Channel and Role for It
As you are up to giving some members of your server the ability to warn on Discord, creating a channel will be more convenient. At the same time, you will have to create roles for the moderators you are about to give the ability. You will still be on the Discord dashboard from where you need to enter your server.
After entering your server, there will be a “+” icon which will be just beside the text channels. You have to click on it to create a channel, which will bring a window with some blank boxes. From there, name the newly created channel as a mod, and press the “Create Channel” button to create the channel.

At this point, you need to access the “Server Settings” part, where you will get to the “Roles” section and enter there. Here, you will have to opportunity to set the name of that role as per your requirement for the server. When you are done with these, you need to scroll down a bit to reach the “Permissions” section.
In this part, first, you will find the “General Server Permissions” section and allow all the permissions under it. After completing it, do the same for the “Membership Permissions” as well. Now, you are left with an important task to save the changes, and you must do it to take things to the next phase.
Step-3: Assign the Moderator Role to the Chosen Users
You again need to enter the “Server Settings” section from where you will have to access the “Members” portion. Now, it is time to add the desired or chosen member of your server for the desired duty. To complete the task, locate the “+” icon first which will be situated just to the right of the username.
So, click on that icon beside the desired username. It is for granting that user the role or power to warn someone. Here, you need to select the role for the user as you have created it in the previous phase above. The text task is to type in ?addmod Moderator into the box that appears a while ago.
It is the last step to give moderator role moderation permissions, including the ability to warn other users. By following the same way, you can also give some other members the ability to warn based on the size of your server.
FAQs
Why should I give someone else the ability to warn on my Discord server?
But while choosing those persons, ensure they are trusted and worthy enough for the job.
Do I need a bot to give people the ability to warn on Discord?
Among these three, using the Dyno Bot is more convenient compared to the other two.
Final Thoughts
Maintaining a large server and warning members alone is never a good idea for the betterment of the server. It will lead you towards errors while you are warning the members who break the rules. Those errors will lead your Discord server to an unstable situation that you won’t ever want to occur.
That’s when knowing how to give people the ability to warn on Discord will save you. With this knowledge, you can give the warning power to others, and they can warn the members who violate the rules. As a result, maintenance of your Discord server will become even easier.