
Discord status mainly indicates in which situation the account user is currently standing. You can change your Discord status whenever you want based on what you are doing. Now, it is also possible to set your own custom status with the message of anything unique or what you desire.
Another cool feature that most users don’t know is the feature of automatically changing status after some periods. If you want to show off this on Discord, learning how to make your Discord status change every 10 seconds or so automatically is a must.
- Different Types of Discord Status
- How to Make Your Discord Status Change Every 10 Seconds Automatically – The Steps to Perform
- Step-1: Download Better Discord and Install
- Step-2: Download an Animation Script and Access Discord Plugins
- Step-3: Move Animation Script to Discord Plugins and Allow the Status Changer
- Step-4: Enter Your Discord Account Token and Set Time Per Keyframe
- Step-5: Set Your Custom Statuses and Check Whether Its Working or Not
- FAQs
- Final Thoughts
Different Types of Discord Status
When you change Discord status message, it will be shown below your display picture whenever you are in a chat. There are four different types of status from which you can select one. The given Discord status are:
- Online
- Idle
- Do not Disturb
- Invisible
Online – If you select this, it means you are currently available on Discord.
Idle – You can set it as your status if you are not near the computer and unavailable on Discord. Even if you don’t put it manually, it will automatically appear when you are away and unreachable.
Do Not Disturb – Setting it as your Discord status will prevent all desktop notifications.
Invisible – It is for those periods when you want to stay active and play games on Discord but still want to tell others that you are not active.
Along with all these, you can also make your Discord status keeps changing automatically after a specific time. It is kind of cool and a feature to show off your Discord status in front of your friends on Discord.
How to Make Your Discord Status Change Every 10 Seconds Automatically – The Steps to Perform
Now, it is possible to change your custom Discord status in a loop of certain time gaps. If you want to know how to change discord status automatically every 10 seconds, here are the steps you will have to perform:
Step-1: Download Better Discord and Install
This feature of changing status after a certain period is not possible with the usual Discord software. That’s why you need to download Better Discord additionally from a trusted source first. After doing so, install the app, and it will launch the Discord app automatically in a few moments.
Step-2: Download an Animation Script and Access Discord Plugins
In this phase, you will have to download another thing again from a trusted source which is an animation script. It will be necessary for the status you are going to upload, which changes every 10 seconds. As the Discord app has opened in the previous phase, you need to go to the Discord dashboard.
Then click on the “Settings” icon, which is located in the lower-left corner of the dashboard. After entering there, scroll down a bit until you find the desired option named “Plugins.” Then click on that option which will open the plugins page immediately.

Step-3: Move Animation Script to Discord Plugins and Allow the Status Changer
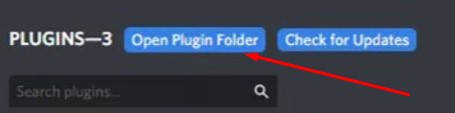
As you are on the plugins page, you will have to click on the “Open Plugin Folder” option from the upper portion of the window. When you click there, it will direct you to the file section where the Discord Plugin folder is located. Then you need to copy the animation script you downloaded a while ago.
In the next part, you will have to paste that file to the Discord plugin folder in the next part. That’s how you will go a step ahead in the process of auto-changing status Discord plugin.
After doing all this, go back to the Discord plugin window, where you will find the status changer button turned off. You need to turn the status changer on by sliding the button, making it blue from gray.

Step-4: Enter Your Discord Account Token and Set Time Per Keyframe
Just below that status-changing slider, you will find another “Settings” option, which is mainly status related. You need to click on it, and it will bring up some new blank boxes for changing your status in a loop of a certain time. The first box will require your Discord account token, which you must provide.
You will get the Discord account token from the local storage, and don’t forget to copy the token. Then paste the copied token into that box, and the token will be unique and won’t match with anyone.
Now is to set the time loop, also known as the time per keyframe. It indicates the time frame between two statuses that will change automatically. As you want your status to change every 10 seconds, you need to set the keyframe to 10000 milliseconds. To do so, put 10000 into that blank “Time Per Keyframe” box.

Step-5: Set Your Custom Statuses and Check Whether Its Working or Not
Below that time per keyframe box, there will be an option called “Change Edit Mode.” Click on it, and it will bring up a box where you can write your desired status. As you won’t write only a status, there will be a plus sign below, and click on it to bring more boxes.
You can add as many boxes as possible and write your desired status there. Along with various messages, you can also add your favorite emojis and animations in there. In the end, click on the “Save” button situated at the lower-right corner of that plugin window of Discord.

After doing all these tasks, go to your profile, and hopefully, you will find those statuses are coming up one after another in 10 seconds. If you keep the timeframe less than 3 seconds, it can lead your account toward a ban.
That’s why always try to set a time frame of more than 3 seconds, and 10 seconds is a better option to stay safe. You can also use various Discord status changer bot to get this job done.
FAQs
Is it possible to set custom statuses along with the default Discord status?
Can I make my Discord status change in my desired time gap?
That’s why you should try to use the time per keyframe of more than 3 seconds and try to keep it within 10 seconds.
Final Thoughts
The default statuses don’t always reflect what you think or are doing on Discord. It is kind of cool to set a custom status in place of those four defaults. The coolness even increases when you put your status in a way that keeps changing after 10 seconds or so.
But to show off this feature, you must gather proper knowledge about how to make your Discord status change every 10 seconds. Only then you can make your Discord profile even more attractive to the audience and your friends present on various servers.