EnjoytechlifeEnjoytechlife
  • Home
  • AI
  • Apps
  • Excel
  • Gadget
  • Software
  • Space
  • Word
Facebook Twitter Instagram
  • Privacy Policy
  • Contact Us
  • Sitemap
Facebook Twitter Instagram
EnjoytechlifeEnjoytechlife
  • Home
  • AI

    Removing Life Events on Facebook: A Step-by-Step Guide

    May 4, 2024

    Winning Charms: Unlocking the Mystery of Online Gamers Lucky Rituals

    April 18, 2024

    ทำไมจึงควรเลือกทะเบียนรถจากเว็บออนไลน์ในยุคนี้

    April 9, 2024

    DUNIA303: Tempat Perlindungan Anda bagi Pecinta Slot Online

    March 20, 2024

    Is Each Spin On Megaways Game Unique?

    March 1, 2024
  • Apps

    Cash Advance Apps That Don’t Use Plaid: A Comprehensive Guide

    December 3, 2023

    How to Block Apps on iPhone: A Comprehensive Guide to App Restriction

    December 3, 2023

    Selling Feet Pics Apps: A Comprehensive Guide to Monetizing Your Foot Fetish

    December 3, 2023
  • Excel

    Create Excel Legend Order Not Changing Its Original Copy

    January 28, 2023

    Learn Why Your Microsoft Excel Not Sorting All Columns Duly

    January 3, 2023

    How To Center a Cell Horizontally in Excel

    November 14, 2022

    How To Assign A Value To A Variable In Excel

    November 13, 2022

    How To Shorten Excel Sheet

    November 12, 2022
  • Gadget

    Leasing a MacBook Pro 16″: A Comprehensive Guide

    August 27, 2024

    Exploring Different Safety Mat Types

    August 7, 2024

    Unraveling the Mystery of Dr. Claw in Inspector Gadget: A Comprehensive Exploration

    December 3, 2023
  • Software

    Streamline Your Workforce with the Best Shift Management Software

    April 21, 2025

    Engineering Software in Education: 9 Benefits for Students and Educators

    March 27, 2024

    How Can a CRM Add Value to Your Organization

    March 25, 2024

    Best Practices in AI Software Development: Your Guide to Success with a Custom Software Development Company

    March 15, 2024

    Is SAS Faster Than SSD?

    February 13, 2024
  • Space

    Unveiling the Enchantment: Explore the Wonders of the Museum of Dream Space

    December 3, 2023

    Plan 9 from Outer Space: Unraveling the Mystery of the Cult Classic

    December 3, 2023

    Trials in Tainted Space Wiki: Unraveling the Galactic Adventures

    December 3, 2023

    Power Rangers in Space: Exploring the Galactic Adventures of the Legendary Heroes

    December 3, 2023
  • Word

    How to Split Pages in Word into Separate Files

    June 20, 2023

    How do I Delete a page in Word that won’t Delete Mac

    May 28, 2023

    How To Get Rid Of Footer In Word

    April 23, 2023

    How to Merge Multiple Pages into One Page in Word? A Complete Guide

    January 2, 2023

    How To Print Gridlines in Word

    December 7, 2022
EnjoytechlifeEnjoytechlife
Home»Word»How To Print Specific Pages Only in A Word Mail Merge Document
Word

How To Print Specific Pages Only in A Word Mail Merge Document

By RodneyOctober 16, 2022Updated:September 21, 20235 Mins Read
Facebook Twitter LinkedIn Telegram Pinterest Tumblr Reddit Email
How To Print Specific Pages Only in A Word Mail Merge Document
Share
Facebook Twitter LinkedIn Pinterest Email

You may be wondering how to print just the pages you need from a huge document that has been mail integrated. In Microsoft Word, the mail merge function allows you to print the merged information or save it as a new document. If you have the option to preview your print job before sending it to the printer, you should almost always choose that route. This article provides a quick overview of how to print specific pages only in a Word mail merge document.

Table of Contents
[Open][Close]
  • What is the function of Mail Merge?
  • How to Print Only Selected Pages, Section Print
  • What does Section do?
  • Process of Printing Specific Pages Only in a Word Mail Merge Document
  • Mail Merge Not Printing Selected Pages
  • Conclusion

What is the function of Mail Merge?

Using mail merge, you may quickly and easily produce documents that are uniquely formatted for each user. A standard letter, for instance, might be made more personable by replacing the generic greeting with the recipient’s name. The document is linked to an external data repository such as a checklist, spreadsheet, or database.

You have the option of merging to the printer or creating a new document when using Word’s mail merge function. The latter is preferable since it allows you to preview your work before printing, which is a crucial step.

What if, though, you just need to print a small section of your combined documents? If you have a combined document that runs to 120 pages but you just need the final 20, how can you do this? One common theory is that printing pages 100–120 is the way to go.

In contrast, using this approach with a mail-merged document will lead to unexpected results. Actually, you won’t receive any results at all since Word puts a section break before each merged item it includes on your page. That means you have 120-page singles, not pages 1 to 120 if you’re printing a document with a single page.

How to Print Only Selected Pages, Section Print

What does Section do?

If you are unfamiliar with how sections function in Word, you may find the process to be frustrating. Word automatically resets the page count whenever a new chapter or section is created. There are three options available to you for resolving this issue:

  • There’s the highly time-consuming and laborious option of just starting to delete pages until only the ones you want are left.
  • Next, you may make your combined document seem cleaner by exchanging all the section breaks for line breaks.
What does Section do?

Get started by reading through these instructions:

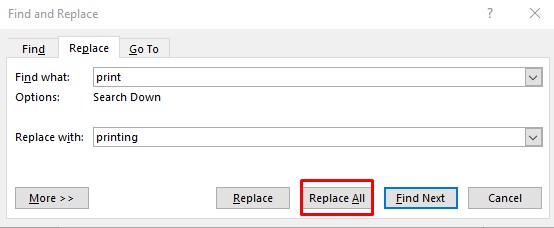
  1. Use the shortcut key combination Ctrl+H. Microsoft Word will open the Find and Replace dialog window and reveal the Replace tab.
  2. Simply type ^b, which denotes a section break, into the Find What window.
  3. If the option to use No Formatting appears, choose it. This will get rid of any search parameters that are format-specific. The No Formatting option may be hidden until you choose More.
  4. Simply type ^m, the page break code, into the Replace With field.
  5. To disable formatting, choose it if the option appears. You may then replace it without bothering about the original’s formatting.
  6. Just click the Replace All button to make all changes.
replace all

Process of Printing Specific Pages Only in a Word Mail Merge Document

You may now print, as usual, specifying the specific page or pages you want to print. The third and last option is the quickest and least complicated one. Please keep in mind that with your combined document, you will be dealing with parts rather than pages. This is how you would go about printing out the form letter for files 100–120:

  • To open the print dialogue, use Ctrl+P.
  • Select s100–s120 from the Pages drop-down list. Notice how the ‘s’ was tacked onto the beginning of the phrase. Word will interpret this as a section range rather than a page range.
  • Simply press the OK button.

The options you choose will be printed immediately.

Mail Merge Not Printing Selected Pages

In the event the printer loses the ability to read the list of pages to print, this error message will appear. If you wish to print just a certain number of pages from a Word document, you may do so by using the – sign to indicate the starting page and the ending page of the range you intend to print.

Here’s what to do if your pages don’t print properly after going through the steps above:

  • Access the print function by going to File > Print.
  • To specify a range of pages, use just the section numbers in the Page Range field. S3–S10 is an illustration of this. A print job spanning pages 3–10 is expected to result from this.

Conclusion

Mail merge is a time-saver since it eliminates the need for you to manually insert each individual element of information into each document. Learning how to print specific pages only in a Word mail merge document will enable you to print the document without any interruptions.

Share. Facebook Twitter Pinterest LinkedIn Tumblr Email
Previous ArticleHow To Find The Slope of The Logarithmic Graph In Excel
Next Article How to Add Space between Bullets in Word- 4 Easy Step
Rodney

Hi, I'm Rodney—tech enthusiast, gadget lover and the voice behind EnjoyTechLife.com. I break down complex tech into simple, actionable tips so you can get the most out of your digital life. Let's explore the future, one post at a time.

Related Posts

How to Split Pages in Word into Separate Files

June 20, 2023

How do I Delete a page in Word that won’t Delete Mac

May 28, 2023

How To Get Rid Of Footer In Word

April 23, 2023

How to Merge Multiple Pages into One Page in Word? A Complete Guide

January 2, 2023

How To Print Gridlines in Word

December 7, 2022

Blue Paragraph Symbol in Word – How to Eliminate

December 5, 2022
Popular Now

Smart Tools for Smart Makers: How Tech Is Changing DIY and Home Innovation

February 10, 2026

How Smart Software Is Changing the Way We Design and Upgrade Homes

February 10, 2026

What Today’s Farmers Need to Know About Connected Agriculture

January 28, 2026

How Best Money Gaming Site Manage Real Time Interaction

January 1, 2026

The Rise of Interactive Digital Experiences in the Modern Online World

December 27, 2025
About Us

Enjoytechlife is a technology blog. I am passionate with technology for this reason start this blog to share my view and knowledge with people who are interested in tech. Enjoytechlife!

For Any Inquiries

Contact : [email protected]

Top Picks
Tech

Smart Tools for Smart Makers: How Tech Is Changing DIY and Home Innovation

By RodneyFebruary 10, 2026
Follow Us
  • Facebook
  • Twitter
  • Pinterest
  • Instagram
  • YouTube
  • LinkedIn
Facebook Twitter Instagram Pinterest
  • Privacy Policy
  • Contact Us
  • Sitemap
Enjoytechlife.com © 2026 All Right Reserved

Type above and press Enter to search. Press Esc to cancel.