EnjoytechlifeEnjoytechlife
  • Home
  • AI
  • Apps
  • Excel
  • Gadget
  • Software
  • Space
  • Word
Facebook Twitter Instagram
  • Privacy Policy
  • Contact Us
  • Sitemap
Facebook Twitter Instagram
EnjoytechlifeEnjoytechlife
  • Home
  • AI

    Removing Life Events on Facebook: A Step-by-Step Guide

    May 4, 2024

    Winning Charms: Unlocking the Mystery of Online Gamers Lucky Rituals

    April 18, 2024

    ทำไมจึงควรเลือกทะเบียนรถจากเว็บออนไลน์ในยุคนี้

    April 9, 2024

    DUNIA303: Tempat Perlindungan Anda bagi Pecinta Slot Online

    March 20, 2024

    Is Each Spin On Megaways Game Unique?

    March 1, 2024
  • Apps

    Cash Advance Apps That Don’t Use Plaid: A Comprehensive Guide

    December 3, 2023

    How to Block Apps on iPhone: A Comprehensive Guide to App Restriction

    December 3, 2023

    Selling Feet Pics Apps: A Comprehensive Guide to Monetizing Your Foot Fetish

    December 3, 2023
  • Excel

    Create Excel Legend Order Not Changing Its Original Copy

    January 28, 2023

    Learn Why Your Microsoft Excel Not Sorting All Columns Duly

    January 3, 2023

    How To Center a Cell Horizontally in Excel

    November 14, 2022

    How To Assign A Value To A Variable In Excel

    November 13, 2022

    How To Shorten Excel Sheet

    November 12, 2022
  • Gadget

    Leasing a MacBook Pro 16″: A Comprehensive Guide

    August 27, 2024

    Exploring Different Safety Mat Types

    August 7, 2024

    Unraveling the Mystery of Dr. Claw in Inspector Gadget: A Comprehensive Exploration

    December 3, 2023
  • Software

    Streamline Your Workforce with the Best Shift Management Software

    April 21, 2025

    Engineering Software in Education: 9 Benefits for Students and Educators

    March 27, 2024

    How Can a CRM Add Value to Your Organization

    March 25, 2024

    Best Practices in AI Software Development: Your Guide to Success with a Custom Software Development Company

    March 15, 2024

    Is SAS Faster Than SSD?

    February 13, 2024
  • Space

    Unveiling the Enchantment: Explore the Wonders of the Museum of Dream Space

    December 3, 2023

    Plan 9 from Outer Space: Unraveling the Mystery of the Cult Classic

    December 3, 2023

    Trials in Tainted Space Wiki: Unraveling the Galactic Adventures

    December 3, 2023

    Power Rangers in Space: Exploring the Galactic Adventures of the Legendary Heroes

    December 3, 2023
  • Word

    How to Split Pages in Word into Separate Files

    June 20, 2023

    How do I Delete a page in Word that won’t Delete Mac

    May 28, 2023

    How To Get Rid Of Footer In Word

    April 23, 2023

    How to Merge Multiple Pages into One Page in Word? A Complete Guide

    January 2, 2023

    How To Print Gridlines in Word

    December 7, 2022
EnjoytechlifeEnjoytechlife
Home»Word»How To Start Numbering from A Specific Page in Word
Word

How To Start Numbering from A Specific Page in Word

By RodneyNovember 3, 2022Updated:November 3, 20227 Mins Read
Facebook Twitter LinkedIn Telegram Pinterest Tumblr Reddit Email
How To Start Numbering from A Specific Page in Word
Share
Facebook Twitter LinkedIn Pinterest Email

A professional touch to any Word document is knowing how to start numbering from a specific page in Word.

You need to create new sections at the position where you wish the numbering to begin. Follow along below as we guide you through this preparation step and then explain the necessary instructions to begin page numbering at a specified location.

Table of Contents
[Open][Close]
  • Process of Numbering Page from a Specific Page in Word
    • Step-1: Enter Page Numbers
    • Step-2: Deactivate Link to Previous Option
    • Step-3: Pick a Starting Point for the Page Number
    • Step-4: Delete the first section’s page numbers
  • How to Add Page Numbers in Word Document
  • Process of Adding Page Number in Word 2016
  • FAQs
  • Conclusion

Process of Numbering Page from a Specific Page in Word

Microsoft Word requires you to break your document into parts in order to automatically number pages beginning on page two and beyond. The use of section breaks permits the use of sequential page numbers beginning with 1.

To begin numbering at the beginning of the page, place your pointer there. To access the Layout commands, select the Layout tab from the top ribbon. Pick the appropriate Section Breaks option from the Breaks dropdown box. If you use the Continuous mode, for instance, the text continues as is and a new paragraph begins at the cursor position.

Specific Page in Word

Now that you’ve split the document in half, you may proceed with the next step. There are two sections here: the first comprises the pages that should not be numbered, and the second has the pages that should be numbered.

Step-1: Enter Page Numbers

It is recommended to begin by adding page numbers to the whole manuscript. To achieve this, select Page Number from the Insert tab’s Header & Footer section’s dropdown list. Based on where you’d want the page numbers to appear, select Top of Page, Bottom of Page, or Page Margins.

Just click where you want the numbers to appear, and you’ll get a menu with options like aligning, bolding text, using brackets, and more. Page numbers should now appear across your whole text.

Step-2: Deactivate Link to Previous Option

Then, in the preparation step, remove the page numbering between the two sections.

To add a page number to a section, double-click the header, footer, or margin of any page in that section. There should now be a new tab in the top ribbon labeled “Header & Footer” with a set of options under it.

For ease of use, the Link to Previous toggle in Navigation should always be enabled. In order to uncheck this choice, click this button. The sections you generated in Step One should now have their own set of page numbers.

page numbers

Step-3: Pick a Starting Point for the Page Number

The page numbering may be restarted from anywhere you choose because the split between the two halves has been eliminated. The page number automatically corresponds to the current page in the text. If, for instance, you have a title page or cover page for your journal or academic paper and you prefer the page numbers to begin with 1, you may need to alter this.

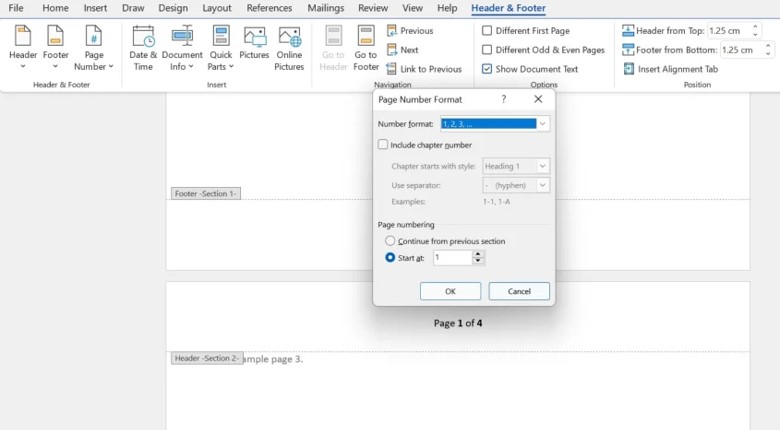
To access any given page in the numbered section, simply click the corresponding number. In the case that you need to include a page number in the header, footer, or margin, you may do so by selecting Header & Footer from the Insert menu. Clicking this button will reveal the document’s Header & Footer tab. Choose Format Page Numbers from the Page Number menu. You may set the starting number by clicking OK at the end of the window after entering the desired figure in Start at.

Format Page Numbers

Step-4: Delete the first section’s page numbers

The procedure is complete after the preceding section’s page numbers have been removed. The initial pages of the manuscript, where your cursor should be, are likely the ones that don’t contain page numbers. Select Remove Page Numbers from the Page Number menu in the Header & Footer group of actions.

It’s expected that the first part will be devoid of any digits now that the links between them have been severed. From the page dividing the two halves, continue numbering the document.

How to Add Page Numbers in Word Document

Process of Adding Page Number in Word 2016

Word may automatically add page numbers to the header, footer, or margins of each page. To make room for the page number, all existing headers or footers will be deleted.

A Page Number option will appear on the Insert section.

Adding Page Number

Select the Top of Page, Bottom of Page, or Page Margin option from the menu, then specify where you’d want the page number to appear. Then, choose the header format you require.

Page Margin option

Indentation of page numbers will emerge.

emerge

In order to secure the header and footer, use the ESC key.

header and footer

Just double-click the header or footer to have access to the page numbering system and make any necessary modifications.

It doesn’t matter if you put the page number in the header or the footer if you’ve made one in the margin. Only after choosing either the header or the footer will you be able to specify a page number.

FAQs

How do I start page numbers on a specific page in Word?

Choose Page Number > Insert > from the ribbon’s contextual menu. After that, decide where you’d want to be and what kind of style you prefer. Make use of Different First pages to avoid having the page number displayed on the first page. Head to Page Number, next Format Page Numbers, and change Start to 0 if you wish the page numbers to begin at 1 on page 2.

Can I start page numbering on page 3?

Yes, select Insert > Header & Footer to do so. Navigate to the menu on the right and pick Different First Page from the selections. Repeatedly click the Options button, and this time pick the Remove Page Numbers box. Select View and afterward Reading View to check your page numbers and make sure you got rid of the one at the top of the first page. Head to Page Number, next Format Page Numbers, and change Start to 0 if you wish the page numbers to begin at 1 on page 3.

How do I start numbering on page 4 in Word?

Select “Format Page Numbers” from the “Page Number” button’s context menu. Select “Start at,” and then type in the desired starting page number.

How do you start the page numbering on page 3 with the number 1?

Before proceeding to page 3, you will need to initiate the process of creating a section break and a page break. After that, locate the Page Number option under the Insert tab in order to guarantee that each of your pages begins with the number 1. Go to the page numbering menu after selecting Format Page Numbers. Next to “start at,” insert 1.

Conclusion

If you’re writing a business or scientific paper, learning how to start numbering from a specific page in Word will greatly improve the document’s readability. Changing the parameters for sections and page numbers might be complicated, so it’s best to divide your pages into segments before you start. Doing so shouldn’t take more than a few moments. Page numbering for the second portion may then be planned out after the previous section’s numbering has been removed, giving you a better idea of where to begin and how to best organize your text.

Share. Facebook Twitter Pinterest LinkedIn Tumblr Email
Previous ArticleHow To Break Page Numbers in Word
Next Article Working On Updates 100 Complete Stuck
Rodney

Hi, I'm Rodney—tech enthusiast, gadget lover and the voice behind EnjoyTechLife.com. I break down complex tech into simple, actionable tips so you can get the most out of your digital life. Let's explore the future, one post at a time.

Related Posts

How to Split Pages in Word into Separate Files

June 20, 2023

How do I Delete a page in Word that won’t Delete Mac

May 28, 2023

How To Get Rid Of Footer In Word

April 23, 2023

How to Merge Multiple Pages into One Page in Word? A Complete Guide

January 2, 2023

How To Print Gridlines in Word

December 7, 2022

Blue Paragraph Symbol in Word – How to Eliminate

December 5, 2022
Popular Now

How Best Money Gaming Site Manage Real Time Interaction

January 1, 2026

Simple Tips for Managing Mobile Games Efficiently

November 19, 2025

The Allure of Mahjong Money Games in Modern Online Gaming

November 9, 2025

How Texas Soil Impacts Home Foundations

October 24, 2025

The Role Of Forensic Accountants In High Asset Divorce Cases

October 9, 2025
About Us

Enjoytechlife is a technology blog. I am passionate with technology for this reason start this blog to share my view and knowledge with people who are interested in tech. Enjoytechlife!

For Any Inquiries

Contact : [email protected]

Top Picks
All

How Best Money Gaming Site Manage Real Time Interaction

By RodneyJanuary 1, 2026
Follow Us
  • Facebook
  • Twitter
  • Pinterest
  • Instagram
  • YouTube
  • LinkedIn
Facebook Twitter Instagram Pinterest
  • Privacy Policy
  • Contact Us
  • Sitemap
Enjoytechlife.com © 2026 All Right Reserved

Type above and press Enter to search. Press Esc to cancel.