The widely used Microsoft Word lets us to write our documents in a single column by default. But there can be occasions where you need to present your work using double columns. Newspapers, magazines, academic journals, and newsletters frequently ask writers to use two columns for better readability and an organized touch. Knowing how to Make Two Columns in Word for One Section can also make your document more accessible to information.

What is a Section in Microsoft Word
One of the neat things about Microsoft Word is that you can divide your document into subdivisions known as sections. Once you have a section, you can format it to your likings. For example, changing the number of columns in a section. Formats and styles in a section apply exclusively to that section once you apply a section break. This is one of the easiest ways to maintain several different formats in a Word document.
Methods for Creating Two Separate Columns
There are three different ways for you to create two separate columns in Microsoft Word. You can use Tables, Linked Text Boxes, and manually change the number of columns in a section. The steps here will guide you through each of the three techniques for making two columns in a Word document. If you apply these instructions point by point, you may seamlessly format any Word document.
Method 1: Using Tables
- For adding a Table, navigate to the “Insert” tab in the Microsoft Word Ribbon.
- Click on “Table” to add a table.
- Create a table with one row & two columns from the drop-down menu.

4. To select the table, select the + symbol in the edge on the upper-left of the table.
5. Select “Table Properties” from the context menu by right-clicking.

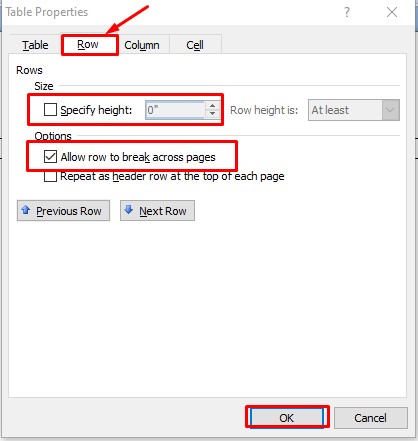
6. Then, Navigate to the “Row” tab from the “Table Properties” window.
7. Next, ensure that the “Specify height” box is unchecked and the “Allow row to break across pages” option is selected.
8. Click the “OK” option from the bottom right corner.
9. Click and drag the boundary between two columns to customize the size.

10. Select the table again using the “+” sign and right-click and hover the cursor over the “AutoFIt” option.
11. Click the “Fixed Column Width” option from the extended menu.

12. For hiding the borders of the table, select the table and navigate to the “Borders” option under the “Design” tab. Then, select “No Border”.

13. Now you can add your text in two separate columns of the table.
Method 2: Using Linked Text Boxes
- From the Microsoft Word ribbon, go to “Insert” and select “Blank Page” to add a new page.
- Change back to page one and from the “Insert” menu pick “Text Box.”
- From the options, choose “Draw Text Box”

- 4. Next, on the first page, draw two text boxes, one on the left side of the page and one on the right side. We’ll call them A1 and B1 for now.
- 5. Just as we did in step 1, insert another new page to be page 3. This step ensures that you may always add a new page to a blank page without breaking the link between text boxes.
- 6. Draw two text boxes on page 2. We’ll call them A2 and B2 in this case.
- 7. Make sure that all of the text boxes are blank. Then, under the “Format” tab, click “Create Link” in text box A1.
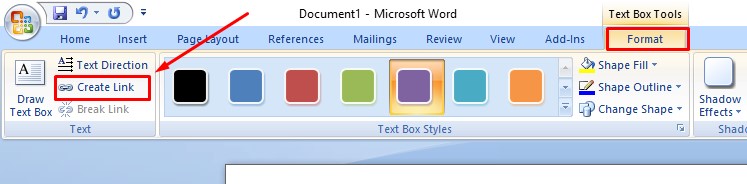
- 8. You’ll see that the cursor takes on the shape of a teapot. Go to the text area you wish to link and click it. It’s text box A2 in this situation. Afterward repeat the procedure with both the text boxes but on the opposite side, like B1 and B2.
- 9. You may remove box lines by right-clicking on the text box line and selecting “Format Shape.” After that, below “Line Color,” select “No line” and exit the “Format Shape” window.
- 10. Now, as you have two linked text boxes in the shape of columns, you can use them for two-column Word document pages.
Method 3: Changing the Number of Columns in a Section
Next Page: The “Next Page” option stops the current section and begins another section on the following page. This sort of section break is effective for splitting up a document into new chapters.
- Go to the “Layout” tab from the Microsoft Word Ribbon.
- From the “Breaks” drop-down menu, choose your desired section break from the “Section Breaks” option. Here’s a quick rundown of what each of them stands for.
- Next Page: The “Next Page” option stops the current section and begins another section on the following page. This sort of section break is effective for splitting up a document into new chapters.
- Continuous: It creates a section break where the cursor was and begins another section on that page. It is essential in making format changes on a page, for example, altering the number of columns.
- Even Page or Odd Page: It breaks the section and moves the upcoming section to the following even or odd-numbered page.Now that you have a new section, click on the “Columns” option.
3. Now that you have a new section, click on the “Columns” option.
4. From the presented menu, select “Two” as it will change the number of columns in that section to be two.

5. Now you have two columns in a new section inside Microsoft Word.
6. You can follow step 2 again to add another section break to stop formats from interfering among different sections.
Create Columns in Word in the Middle of a Document
Conclusion
Maintaining columns is an easy way to turn your writings more organized and polished. You can also include diagrams, illustrations, and figures in separate columns to make them more presentable. When used properly, you can make an impact on the readers with your writings. You can add any number of columns into Microsoft Word by following the steps discussed above.