
The alignment of the lines in a word document is crucial for maintaining the shape and symmetrical view. Sometimes aligning the line towards the left make the shape and look of the paragraph pleasant and acceptable. And in some cases, right aligning the text of a line does the work nicely for the writer.
But you may wonder a bit after hearing about how to right align part of a line in word. It may look difficult after hearing the name and title of this lesson when you are new to MS word. If you pay attention to the discussion below, the whole task will become a lot easier.
Why You May Need to Right Align Part of a Line in Word
Alignment of the text in a line is like one of the most crucial ornaments of your MS word article. At the same time, it is one of the must ones to apply, and without it, the article you have written may look dull. You may either need to right-align the text in a line or left align it based on your necessity.
When you right align part of a line, the other part of that line should be left aligned. So, it is just the same if you are looking for the answer of how to left and right align on same line in word. Aligning the text both left and right on the same line is surely new for most of the new word users.
That’s why the first priority should be knowing about why you may require to apply this on your word document:
- When you are wanting to create a bigger gap between the two sections of any line, you may need to right align part of a line
- If the line indicates any topic on “anything versus anything,” you will have to apply right alignment on a part that line
- Sometimes you may need to start writing from each end of the line, and at that time, both left and right alignments of a single line are must
How to Right Align Part of a Line in Word – The Steps to Follow
If you are puzzled about how to align text in word on both sides, then the answer is not far away. But first, stay calm, see the procedure in a step-by-step way, and then apply it during the time you write your word article.
Now it is time to take an attentive look at the steps to sincerely right align part of a line in word along with left aligning the other part of it:
Step-1: Select the Document and the Line for Left and Right Alignment
If you are wanting to apply this partial right alignment to any written article, then you will have to open through a word document first. But if you are writing the article, and want to apply this alignment in any line instantly, then any extra task won’t be necessary.
While doing all these, you must pick the line correctly in which you want to apply both left and right alignment.
Step-2: Access to the Paragraph Section
While you are writing or just opened the article on word, there will be a panel of options above. From that panel, find “Home” and click on it to ensure you are in the correct tab. After that, there will be another section right above the phase from where the text writing part starts.
The last option of that section will be “Paragraph,” and there will be an icon beside that option. It is known as the “Paragraph Settings” icon, and you must press on it to access this portion. Thus, you will be directed to the “Paragraph” dialogue box with a small window appearing with regard to that.

Step-3: Left Aligning of the Text in the Line
In the dialogue box, you will find three different sections; and the first one is “Indents and Spacing,” and you must click on it. Under the “General” portion of this section, there will be a box for alignment with a dropdown menu bar. There will be four alignment options, and you need to select “Left” and click on it.
You can also simply select the text line and press “Ctrl + L” to the left to align that line.
Step-4: Right Aligning of the Text in the Line
After you have left-aligned the text line, the next part is to align the same line to the right side of the word panel. At first, you will see a small symbol just above the top-left corner of the text-writing section. The symbol or icon will be just like the same as indicated in the given picture below.
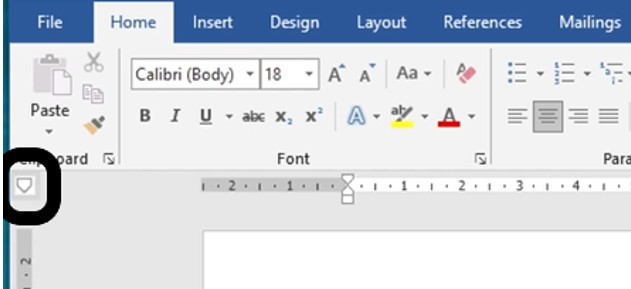
Now, you will have to keep clicking on that icon casually to change the symbol. With two or three clicks, the symbol will be changed twice or thrice, and the right tab symbol will be revealed. The symbol, logo, or icon, in this case, will also be the same as the given picture we have down here.

There will be a ruler all around the writing section, but if not so, you can easily bring that up. Either manually bring it from the “Review” section of the top panel, or simply press “Ctrl + R.” As the ruler arrives, locate the rightest area of the selected line and relate it with the ruler above.
As you find the perfect portion of the ruler related to your desired right-alignment section, click on that section of the ruler.

Then simply press the “Tab” key from your keyboard, and the mouse cursor will jump to that desired part of the line. As you start writing from there, the text will go left serially when you will write more words.

How to Adjust Page Margins in Microsoft Word
Final Thoughts
As we have discussed above, proper alignment is like a crucial ornament for your word document. So, it is a must for the article to have just the right alignment that matches with the article topic and line requirements. When the term comes on both right and left alignment, it’s relatively unfamiliar for the new users.
But it will remain incomplete without learning about how to right align part of a line in word. Though it is a bit complex than single left alignment and right alignment, it is a crucial one to learn.