
Whether you are doing an office task or a university assignment, MS Word is the ultimate option to press.
There are plenty of options related to this software. You can edit a document according to your style, including border lining. If you want to draw or add a border, you must open MS Word first. After that, in the middle of the third row, there is an option named Borders. Generally, you will see the logo of it. The logo resembles four squares with a downward arrow. Click on the arrow, and the option of adding a top border will come.
Today we shall enlighten you with all the facts regarding the border and how to add a top border in words. For details, read the rest of the article.
How To Add A Top Border In Word – Ultimate Hack Of MS Office

If we have computers, a set of software is immensely necessary. One of the bunch is MS Office. And MS Word belongs to this official package. However, since there are plenty of features to edit a document, finding the exact option seems a bit complex. In addition, all the features are displayed by symbols, so if you need to keep some of the seconds to learn the name or work of the feature.
For Windows
A symbol displays the border drawing or adding process on MS Word. The symbol includes four squares with a downward arrow. However, the steps explained below are also applicable to how to add borders in word on mobile.
- Firstly, open MS Word on your computer.
- After that, click on Home. It is on the upper-right corner of the screen.
- In the third row at the middle of the options, you will see a small symbol including four squares together. And a downward arrow on the right. Press the arrow. The option to add a border will come.
- Now, select ‘top border.’ Your borders will be drawn, and this is how do you put a border on only one page in Word?
For iOS
Now let’s know the ultimate process of how to add a top border in word on mac. MacBook’s applications are always complex for Windows users. But we are here to make it easy for you. Here are the steps to draw borders on MS Word.
- First, open MS Word on your MacBook.
- After that, press the home button in the upper-right corner. You will find all the options to edit your document.
- Now, in the middle of the third row, you will see a symbol where four squares together with a downward arrow. Click on it.
- A gallery will open shortly with various borders like the top, down, left, right and others. Click on your desired one. And your border will be added.
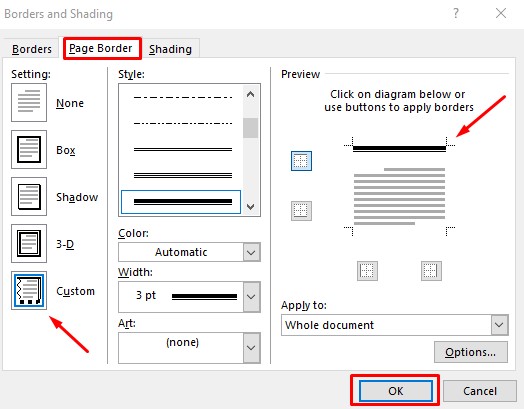
On the last option, Borders, and Shading, you can change the styles of the borders and internal elements. Let’s have an example. How to add a white top border in word?
First, add the border. After that, go to the last option, named Borders and Shading. A dialogue box will open, and you will see an option for colors. Click on it and select the white color. Your borders will become white. You can also change the width of the lines. About how to add border in Microsoft word mobile app? Microsoft has yet to discover or add this feature to mobile applications. So, for now, adding borders in the MS Word app is not available.
Changing Border Styles
You can do it easily if you want to change the borders and shading styles. Click the downward arrow; the last option is ‘borders and shading.’ Click on it, and you will see all the shading options and border styles.
How to change the color of a top border in a word? You can change the color of the border lines from that dialogue box. Moreover, there is an option to change the internal color of the boxes. To change the border width, select width from the same dialogue box. The maximum width is 6 points or 2.12 MM.
FAQs

How do I create a custom border in word?
How do I change borders in Word?
Where are page borders in Word?
How do I insert a 1-inch border in Word?
Conclusion
Sometimes, finding the options on MS word is difficult. So we covered all the tricks about how to add a top border in word. After a few practices and applications, you will not require to see this article anymore to add borders in your MS Word. Lastly, we recommend several applications of borders since they will help you to edit your document enormously.