
You may be wondering how to create a letterhead template in Word if you want to acquire a solid clientele with an eye-catching brand. The use of letterhead may elevate the professionalism of any document, whether it’s an invitation, brochure, or letter to a client. The first step in creating a letterhead is deciding what information you want to include. You may be asking how to go about making anything after you’ve settled on what it is you want to manufacture.
Things to Consider before making a Letterhead Template
While it is easy to create the template, you must plan it. Drawing a rough draft of your concept on paper might be beneficial. Nothing like that is more of a concept or outline. This helps you to select the beginning header. You may make adjustments or utilize other versions after you understand the potential of templates.
Components of Information
Depending on whether you’re an individual, an institution, or a corporation, the list of elements may differ. For instance, if you’re creating church letterhead, you might not include a tagline, and if you’re a professional legal company, you might not include social network links.
Product labels, taglines, names & addresses, contact information, website URL, email address, social media links, and so on are some of the factors to consider. After you’ve decided which elements to add, you’ll need to decide where they’ll go.
Template Graphics Considerations
Undoubtedly, pictures or logos may enhance and affect the design. Graphics, on the other hand, can cause design issues. You could have a fantastic image, but your computer printer isn’t suitable for the job. The capabilities of your printer are insufficient to show the image. Hence make sure to keep it in mind and design accordingly.
Whether you work for a firm or group, examine if they have a theme manual or branding. They will frequently have authorized images in the right image size and file format they may provide. Style guidelines, like templates, can range from simple to sophisticated.
Process of Making a Letterhead Template on Word
It’s not challenging to make a letterhead template. The simple instructions outlined here can assist you in making one in no time.
Step-1: Begin by Launching a Blank Document
Launch a new Word document to proceed. Next, go to the top menu bar and choose View from the menu bar. Choose Print Layout under the View menu.

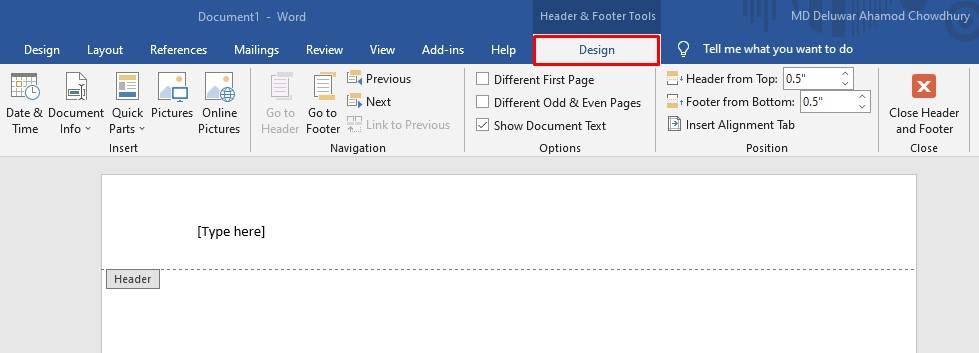
Step-2: Select Header Style
Go to the Insert tab once you’ve chosen the print layout. Next pick Header. A list of several initial Header styles will appear in Microsoft Word.

Step-3: Design Header
Select your preferred style by clicking on it. The top Blank theme is chosen here. You will now be in “Design” mode, with a Header indicator tab on the left and placeholder text above.
Step-4: Make Required Modifications to The Picture or Logo
Select Pictures from the Insert section of the Design panel. Your image will be scaled down to suit the width if it is too big. An Insert File box will appear. Click Insert after locating your graphics file. Check out whether your picture is balanced. The logo is doubled in size in the example below.

Step-5: Resize Logo or Banner
Select Size and Position from the menu bar when you right-click on the logo or banner. A dialog box displays, offering many resizing choices. The logo above was originally 20% and later been lowered to 10%. Hit OK to confirm the new image size.
Step-6: Align the Logo
To align the image to the center, first, click on it, then navigate to Home. In the Paragraph section of the Home panel, tap on the Center Alignment button. This completes the letterhead creation in Word.
Step-7: Save Letterhead Template
To proceed, click on Save As from File menu. In the Save As window, switch the file type to Document Template (*.dotx). Give your template whatever name you like and save it.
Load Microsoft Word and click New from the File menu to view the template you just created. After that, select Personal and double-click the template. A new document will appear on the screen.
How to Import Letterhead Into Word
Importing letterhead to work would be highly useful and save operational expenditures if you have many letters to fax. The procedure is quick and straightforward. The instruction below will help you import letterhead to Word.
- Scan the current letterhead in high resolution and save it in an image format such as *.jpg, *.gif, *.jpeg, etc.
- Launch your Word document and click Insert from the top-level menu. Insert Watermark is a feature you’ll find in the options.
- Select the icon beside Picture in the Insert Watermark section. Afterward, select the scanned letterhead image by pressing Select Picture. After you’ve chosen your image, click Insert.
- Tick the “Washout” option in the “Insert Watermark” box to uncheck it. After that, type 100 in the “Scale” box and press OK.
After you’ve finished these procedures, your scanned letterhead should display on your document as a foreground, mildly grayed out, or faded. Your document will print correctly and will not be faded when you print it.
Common Design Mistakes to Avoid When Creating a Letterhead
While it may seem like a straightforward task at first glance, creating a professional-quality letterhead requires some serious thought and a keen eye for detail. Here are some of the most frequent errors that you should try to avoid:
- Many individuals make the common error of cramming too much information into their letterheads rather than keeping it brief and to the point. Incorporate the author’s name, email id, mobile number, physical address, and fax number (if applicable) in this section of the letter. You can address any other concerns in the letter’s main body.
- Usage of Excessive Colors: While incorporating some color into your letterhead design will help it stand out, it’s important to use color judiciously. It’s not a good idea to utilize a lot of rich shading in the photographs you feature in your letterhead because they’ll need to be crisp and readable at a tiny size. You should also design your letterhead such that it is legible in black & white, as this is how it will most likely be reproduced.
- Finally, a bad letterhead design lacks a central focus that would ordinarily direct the reader’s attention to the most crucial details. Your company’s logo will likely be the main attraction.
What text should be included on a letterhead?
When written tiny, sans serif fonts may be simpler to read than serif fonts with their more classic appearance. This is why the latter is typically considered to be the greatest letterhead font.
What colors should be used on a letterhead?
How should a letterhead be laid out?
Conclusion
Your message will not be handled just by creating a letterhead template. You’ll have to continue writing your letters. At the very least, you won’t have to input your name and address every time. Knowing how to create a letterhead template in Word can save you time since you won’t have to type the same information repeatedly.