Sometimes the size of your screen may seem a bit odd, and it may not match with the monitor. When this phenomenon happens, text, windows, and icons sometimes look smaller and sometimes bigger. If you face the screen doesn’t fit monitor Windows 10 issue, it’s mainly happening because of the resolution problem.
The possible time for this issue to suddenly appear is when you just upgraded the system to Windows 10. It can also trouble you with its appearance at the time of connecting your computer with another monitor. But this error shouldn’t bother you much as we have the collection of some effective fixing methods.
The Reasons that can Cause Screen Doesn’t Fit Monitor on Windows 10
When this issue appears, the content on the screen will look either big or small on the monitor. Even if you try to watch any video with that improper screen and monitor relation, your PC will turn black suddenly. It is a severe problem that needs fixing as early as possible.
But before fixing, you need to know about the possible reasons that can cause this problem, and those are:
- The mismatch of resolution in both screen and monitor can lead the screen won’t fit with the monitor
- If your PC has an incorrect scaling setting or any outdated display adapter drivers, this fitting issue can appear instantly out of nowhere
How to Solve Screen Doesn’t Fit Monitor Windows 10 – The Fixes to Try
By knowing about the possible reasons behind this issue, you will get a better overview. The more you become familiar with this problem, the path to fixing it will be easy. It will even become easier with our fixing methods discussed below. Now the fixing methods to adjust screen position windows 10 that you must try are:
Method-1: Adjust the Display Resolution and Scaling of Windows 10
In most cases, improper display resolution is the main reason behind the mismatch between the screen and monitor. That’s why adjusting the display resolution of your computer is the first fixing method you need to apply. Scaling also matters in this case, and you can adjust it as well from the same place.
The steps you need to follow for completing the task are:
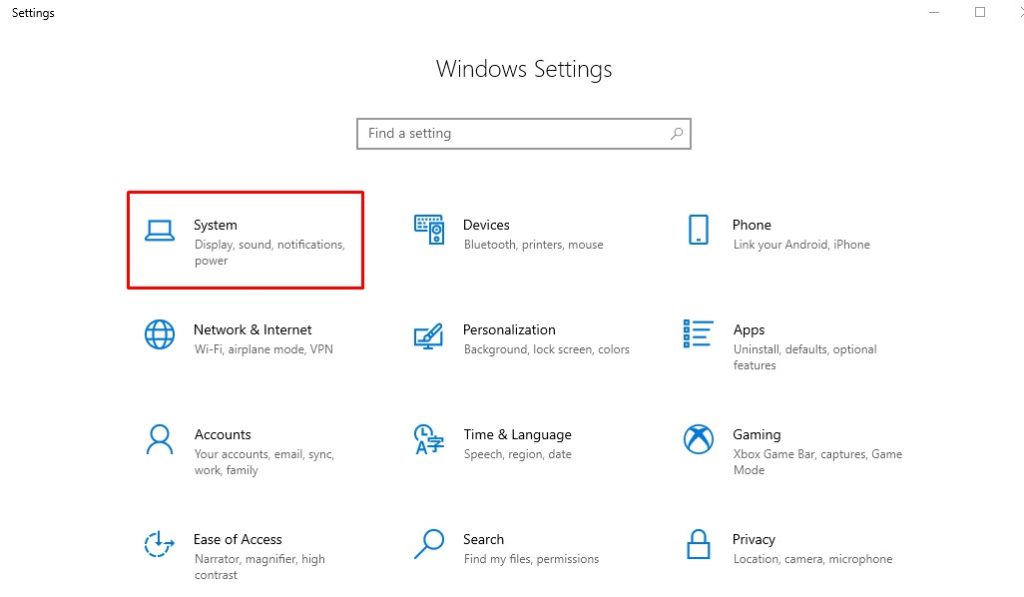
Step-1: First, you need access to the “Settings” section and press “Windows + I” for the process. Then you will be directed to a new page where you will find various settings types related to your PC. From those various settings options, locate the “System” section.

It is most likely present in the first portion of the list of all settings, and then you must click on it to access that part.
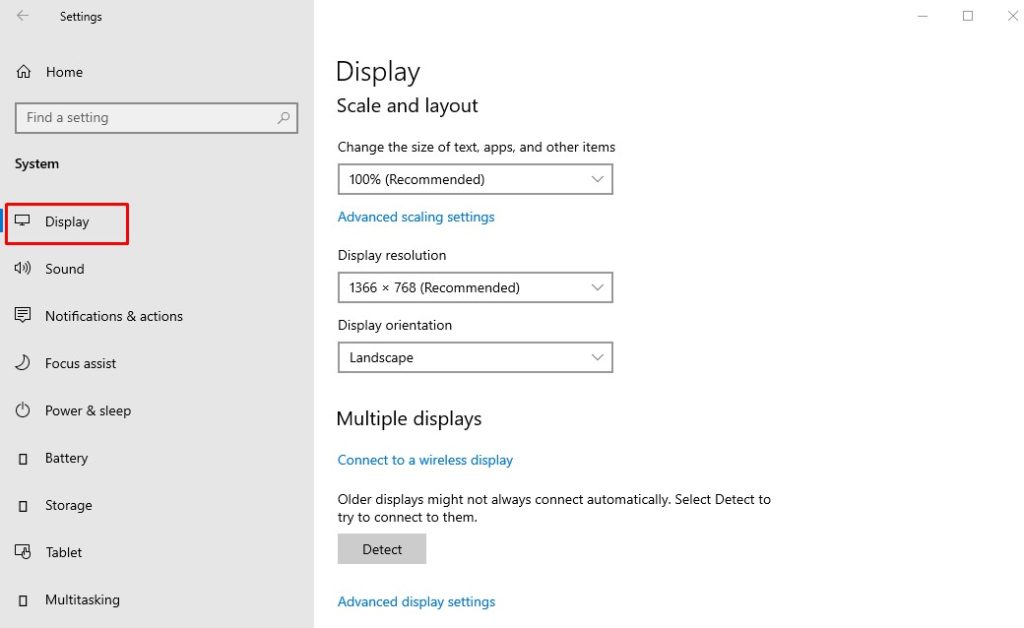
Step-2: After entering, there will be various menu bars at the left of your screen related to “System Settings.” The first one of those menus will be “Display,” and you need to press that. As you access there, you will find the Display Resolution, which is most possibly either too high or too less.
Set that to the recommended resolution from the given box, and jump into the next part named “Scale and Layout.” It is situated just above the previous part, and you need to set it how the PC recommends. Hopefully, now the screen position will be nicely adjusted with the monitor.

Method-2: Adjustment of the Refresh Rate
Improper refresh rate can also cause the fitting mismatch between the screen and the monitor of your PC. If you set the refresh rate correctly, there is a high chance that this serious issue will be fixed. The steps to follow for you in this matter are:
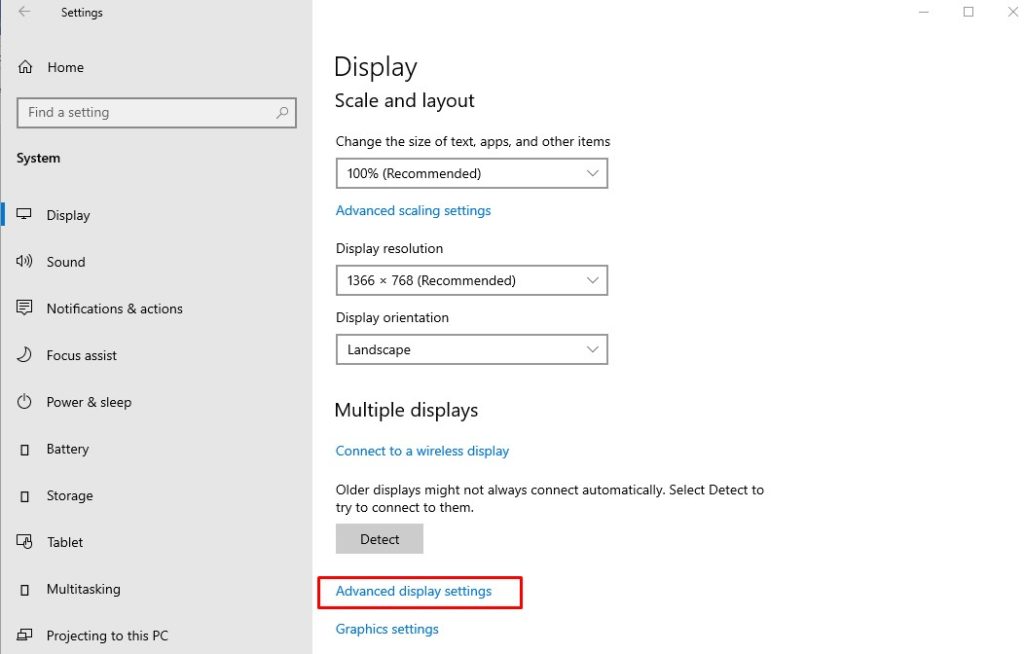
Step-1: Like you did in the previous method, at first, enter the “Settings” section and enter the “System” part from there. From the left-side menu bar of this part, click on the “Display” menu. These are just the same as the previous method, but the next portion is the key in this fixing method.
At the end of this “Display” page, you will find an option named “Advanced display settings,” and click on it. As a result, a new window will appear, having several advanced settings options for you to work with.

Step-2: On this page, there will be another option named “Display adapter properties for Display,” and you will have to click on it as well.

After clicking, a new small window will pop up on the screen. Click on the “Monitor” part of that window to check the refresh rate of your device. If that is not suitable with your PC, change it to the suitable one instantly.

Method-3: Update the Display Adapter Driver
Another fixing method that will also be effective to solve the screen doesn’t fit monitor Windows 10 is updating the display adapter driver. Let’s see how you can do it:
Step-1: The first thing you need to do is right-clicking the Windows Start button from the bottom-left corner of your screen. An options list will appear because of it, and you need to locate and click on “Device Manager.”

Step-2: By clicking on it, you will enter this section, and you will see the list of all the drivers on that newly-appeared page. From those drivers, locate the “Display Adapters,” and take your mouse cursor there to select it. After selection, do right-click, and “Update Driver” will appear because of it.

Click on it, and you will be directed to a new page where you need to choose “Search automatically for updated driver software.” As a result, the program will search, find, and update the display adapter driver for you all by itself. So, you won’t face the screen and monitor mismatching issue anymore.
How to Fix a Stretched Screen Display Issue on Windows 10
Final Thoughts
After updating your computer’s Operating System to Windows 10, you may face the fitting issue between the screen and monitor. It will be a matter of disappointment if you somehow collide with screen doesn’t fit monitor Windows 10.
Though it is an irritating issue to face, we have gathered some effective fixing methods for you. You need to get to the root of this issue and apply those fixing methods one after another to eliminate this error.

