
You may be curious about how to see other computers on network Windows 10 if you’re wanting to observe devices on your network. It’s common for users who upgraded from Windows 7 or 8 to Windows 10 to claim that they’re now unable to see computers on their local network. This problem also sometimes affects users of older versions of Windows 10.
Misconfigured equipment or a severed internet connection are common culprits behind this issue. This prevents you from seeing any devices that belong to a certain group. Several methods, including adjusting network settings, starting Command Prompt, adjusting router settings, and others, are outlined below that may help you fix the problem.
- Methods to see other computers on the network in Windows 10
- 1. Restarting the computer:
- 2. Configuring Network Discovery:
- 3. Verify to see if specific services are being activated:
- 4. Support for SMB 1.0 and CIFS File Sharing:
- 5. Change Router and DNS Settings
- 6. Change your Firewall Settings
- 7. Change Your Network Profile to Private
- 8. Use Command Prompt to Enable Network Discovery
- 9. Disable VPN Software
- 10. Reconfigure the File and Sharing Services
- Cannot See Other Computers on Local Network Fix
- How do I use CMD to view all of the linked devices to my network?
- Frequently Ask Questions (FAQs)
- Conclusion
Methods to see other computers on the network in Windows 10

The answer is a simple procedure. Just some small flicks here and there will suffice. We shall discuss a few of them to assist you to find out how to see other computers on network windows 10.
1. Restarting the computer:
Rebooting the system, contrary to several reviews, has resolved the problem. Perhaps the network’s operating system got damaged and rebooting the computer fixed the problem. However, it may require a few resets before you can see additional devices on your network.
- Shut off the computer by heading to the Start menu and choosing Shut Down.
- Disconnect the Ethernet connector from the computer if you’re utilizing Ethernet as your web service. Allow it to settle for several minutes until plugging it again in. Reboot the router as well.
- After that connect the Ethernet wire and turn on the computer.
- Examine the file folder’s connectivity to see if you can detect any devices on the network.
There’s none of it to be concerned with if one can’t see the devices. Other options are available to you.
2. Configuring Network Discovery:
It’s possible that perhaps the source of your issue would be that your computer’s network visibility is disabled. In this scenario, you must activate it.
- Click to the Start menu, click on the Settings option, and then select Network and Internet.
- Please ensure that Ethernet is connected to the private connection inside as well. It won’t be possible to access your documents or printer among additional devices connected to your network while it’s configured to a public network. Verify whether the Wi-Fi profile is private when you’re connected to it.

- To create a private setting, go through the left bar and select Ethernet, then select Network mostly on right.

- To activate private settings, go to the Private tab and select it.

- Return to that same Status menu that appears on left and select Sharing options from the Change your network settings menu that appears on right.

- If they aren’t already switched on, select Switch on network discovery and Switch on file and printer sharing.

- Then browse to the All Networks section. Ensure that the option password-protected sharing is disabled. Allow public folder sharing the very similar moment. You won’t be able to view any devices on your system until all of these settings are activated. Keep in mind to click Save Changes after you’ve made your adjustments.

3. Verify to see if specific services are being activated:
Some specific services are required for the appropriate presentation of the neighboring pcs upon your connection. Let’s take a glance at it.
- Using your computer, go through the Start box and type Services.
- Check to see whether the following options are available. DNS Client, Function Discovery Provider Host, Function Discovery Resource Publication, SSDP Discovery, Server, UPnP Device Host, and Workstation are all activities to search for. This page will show you whether they are deactivated or active.

- If any of the programs listed above aren’t operating, click it with your mouse, right-click it, and choose Properties. Choose Automatic from the drop-down icon beneath Startup Type. Lastly, click Apply, then Start, then Ok.

If the Startup Type for a program is Manual, you can leave it that way.
4. Support for SMB 1.0 and CIFS File Sharing:
SMB 1.0/CIFS is a Windows 10 baseline tool that allows users to upload documents and printers. SMB 1.0/CIFS must be activated in addition to access to multiple devices. There might be no data exchange without it. So, here’s exactly what you need to conduct:
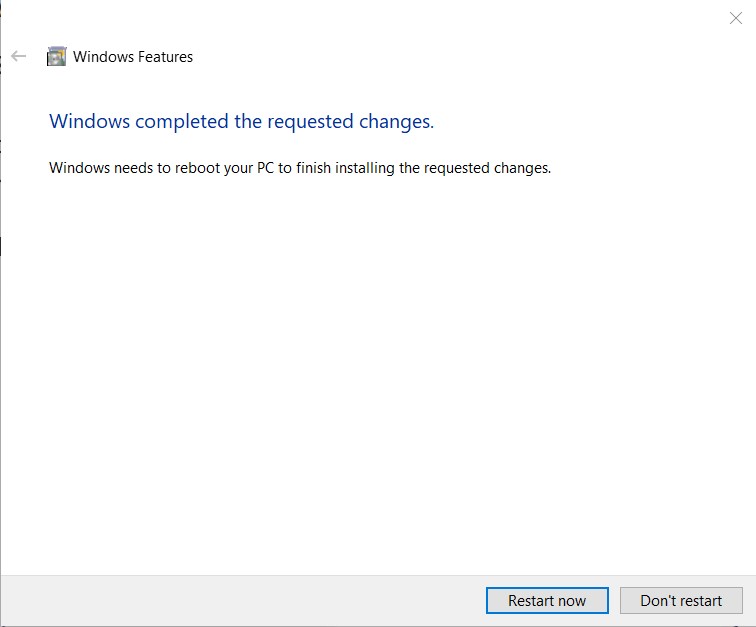
- Proceed with your Windows 10 desktop’s Start screen. Inside the search box, write “turn windows features on or off”. By tapping on it, you can choose the appropriate outcome.

- SMB 1.0/CIFS File Sharing Support can be found by scrolling down. Activate it by checking the box. Now help ensure all options of SMB 1.0/CIFS File Sharing Support are switched on, press the ‘+’ mark next to the check box. Don’t let it slip your mind. Click the OK button.

- After you’ve made the adjustments, Windows will request you to reboot the pc. Once you reboot it, your pc should have completed the adjustments you wanted.
5. Change Router and DNS Settings
Your Windows 10 machine may not be able to connect to the network if the DNS settings are incorrectly configured or if you have made a manual modification to the DNS server. The issue might be caused by the fact that the manually altered server is not compatible with the DNS servers used by the other systems. You’ll need to go the router’s setup page and alter the DNS settings therein.
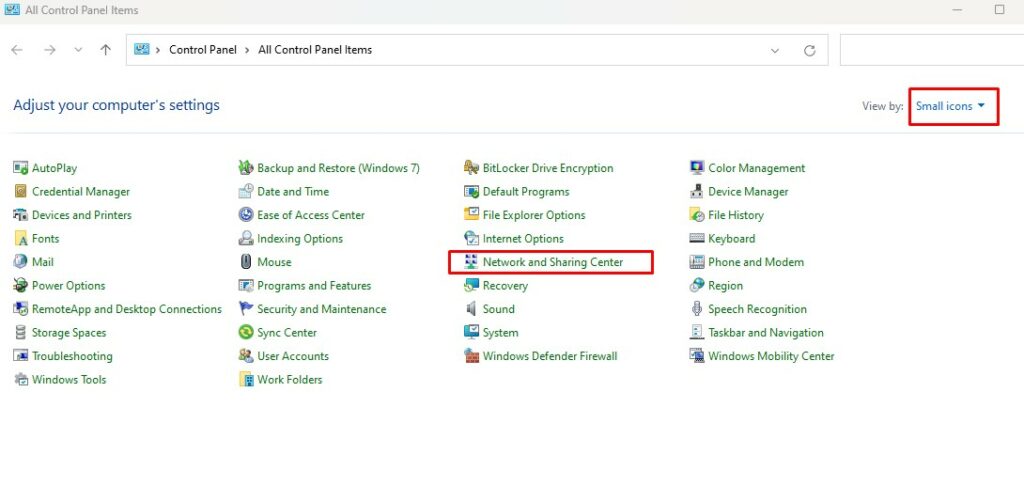
- Navigate to the Control Panel.
- Select Small Icon as the View By option.
- Navigate to the Network and Sharing Center.
- Pick Change adapter settings.

- Choose the Network Icon that applies to you.
- Select its properties by right-clicking on it.
- Select TCP/IPv4 from the drop-down list.
- Pick the Properties menu item.
- You may have your computer utilize automatic DNS detection by checking the box labeled Obtain DNS Server Address Automatically.

- The following procedures should be implemented to modify the router’s settings once automatic DNS detection has been enabled.
- Launch a Browser (Chrome).
- Enter your IP address in the browser’s address box.
- Launch Command Prompt in administrative mode to view IP address.
- Input ipconfig/all and hit the Enter key.
- Take the IP address shown next to “Default Gateway” and paste it into the appropriate box.

- Entering the IP Address after pasting it will take you to the router’s login screen.
- To proceed, please enter your username and password. The login credentials are often printed on the router’s rear. Admin and admin might be the initial password & user name, correspondingly.
- Look for a WiFi Isolation, Client Isolation, or Access Point Isolation option.

- Switch off this feature. Save your modifications.
6. Change your Firewall Settings
The problem may also be caused by Windows Firewall, which prevents your computer from establishing a secure connection to a network. The procedure is as follows:
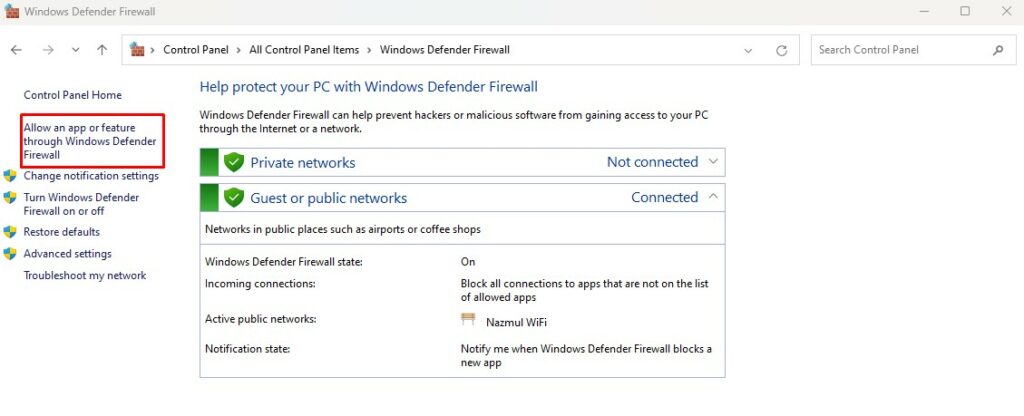
- Navigate to the Control Panel.
- Select Large Icons as the View By criteria.
- The Windows Defender Firewall may be accessed by clicking on the corresponding button.
- Choose the option that reads “Allow an app or feature through Firewall.”
- Exit the window by clicking the Save button.
7. Change Your Network Profile to Private
One possible cause of Windows 10’s inability to detect adjacent devices on a network is an incorrect network profile. If your network profile is incorrect, you won’t be able to share resources like printers and files.
One way to do this is by modifying the Network Profile, which entails the following steps:
- To access your network and the Internet, launch the Settings menu.
- Select the Status tab on the sidebar.
- Click the button labeled Change Connection Properties.
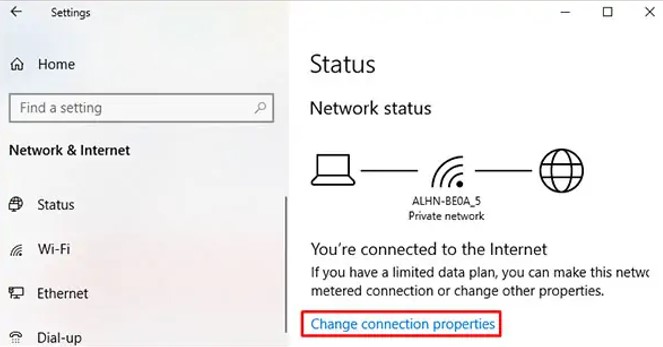
- Select the Private option.
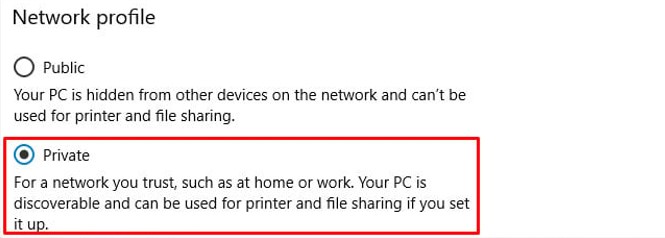
The other computers will recognize it as trustworthy and able to view and communicate with it when this is done.
8. Use Command Prompt to Enable Network Discovery
It’s possible that your PC won’t always have Network discovery turned on. Hence, the issue will be fixed by utilizing the Command Prompt in this approach.
- Run the Command Prompt as Administrator.
- Input the following, and hit Enter:
- Exit the Command Prompt. After that, restart your system.
9. Disable VPN Software
It’s possible that after connecting to a VPN, your device won’t be able to view other devices on the same network. Whether you are, you should try eliminating that link to see if the issue occurs without it. The procedure is as follows:
- To access Network and Internet, select Start and then Settings.
- Navigate to the VPN menu.
- Look for your VPN program and click the Uninstall button.

- Verify the legitimacy of every given dialogue choice. Then restart your system.
10. Reconfigure the File and Sharing Services
This error may also occur if your computer is set to automatically deactivate certain services upon startup.
This causes issues with the computer network’s discovery capabilities, which include the Function Discovery Provider Host, Function Discovery Resource Publication, SSDP Discovery, and the UPnP Device Host. The Services Management window is where you’ll go to make any necessary adjustments to these settings. Detailed instructions are provided below.
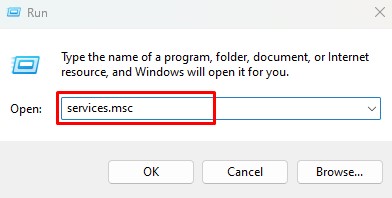
- If you want to launch the Run program on your Windows device, press the Windows key plus R.
- Input the services.msc command and hit Enter.
Browse through the list of services and follow the instructions for each one:

- Make that the Startup Type is set to Automatic (Delayed Start) underneath the General submenu.
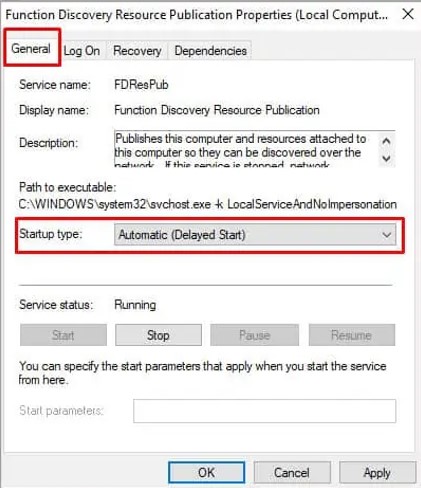
- Proceed by selecting the Start button. Save your modifications.
Cannot See Other Computers on Local Network Fix
How do I use CMD to view all of the linked devices to my network?
The arp command is indeed the ideal approach to identify together all devices linked to the exact connection as you. Run arp -a from the Command Prompt. The IP address of your internet modem is displayed first, beside the Interface. After that, there’s a collection of IP and MAC addresses (Physical Addresses).
Most of the IP addresses that proceed using identical digits as your broadband router belongs to a similar network or subnet. All of these gadgets are linked to your connection. The following represent IP addresses utilized for multicasting, not actual devices. They’re typically utilized by legitimate devices connected to the network to broadcast media.

Frequently Ask Questions (FAQs)
What is the procedure for adding a machine to my network?
What Happens When You Perform a Network Reset?
What Are the Differences Between IPv4 and IPv6 Protocol?
Conclusion
By enabling you to access multiple devices on a similar network, Windows enables users to exchange documents, images, films, printers, and a variety of other items. Even though you’re not a rookie Windows 10 user, you may experience issues exchanging documents even occasionally. Don’t be alarmed. Use the methods we’ve discussed thus far. They should be able to assist you with how to see other computers on network windows 10.