
Microsoft Excel supports the toggle button and options button for inclusion in a worksheet’s design. You may choose just one element from a listing using option buttons, also known as radio buttons. The toggle button may either be activated or deactivated, enabling you to flip between two modes, for example, on and off.
Form or ActiveX controls are used for assigning a button’s behavior after it has been placed in your workbook’s design. When your job is over, you may wish to eliminate those buttons, and this article explains how to delete button in Excel.
Removing Buttons in Excel
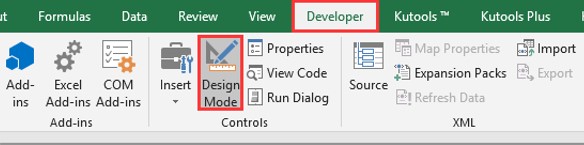
Enabling the Developer Tab in Excel is the first step. Launch Excel which you may locate in the Start menu or the Applications directory on your Mac or computer. As long as you don’t remove or reinstall Office Software, the Developer tab would be available for you to employ.
If you’re using Windows, you’ll find the “File” tab in the editing menu over your working space. Navigate to the Options/Preferences menu, then pick Customize Ribbon & Toolbar. New choices will appear in a different window for the editing menu.

Choose “Developer” by checking the box beside it. It may be found under the “Main Tabs” section. Afterward, click on the Save button and exit the application. Sometimes, a window does not automatically shut, and you will need to shut it manually.
After pressing Developer, turn on the Design Mode by selecting it from the menu.
Command buttons may be selected by picking one and pressing the Ctrl + A keystrokes at the same instant.
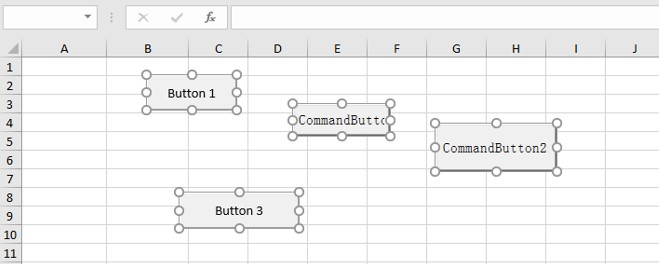
To remove all of the buttons you’ve chosen, just hit the Delete option.
Deleting Macros in Excel
If you’re working with Excel, VBA macros can spare you a ton of time. You may simplify many tedious activities using basic VBA macro scripts and build new Excel operations and capabilities. Some Excel workbooks may benefit from having all macros removed, though.
Right-click on the macro and choose “Delete” to remove a macro. Deleting unnecessary macros makes it simpler to examine macros in the Visual Basic Editor’s Code window and in the Macro dialog.
You may remove a macro in an active worksheet by utilizing the Macro dialog panel or the Visual Basic Editor. To remove a macro from the Personal Macro Workbook utilizing the Macro dialog panel, you must first unhide the Personal Macro Workbook. It is possible to remove any macro in any open worksheet or the Personal Macro Workbook without unhiding it by employing the Visual Basic Editor.
Macro dialog box method:
On the Ribbon, choose the Developer tab and then the Code category. Right-click the Macros button and choose Open. Pick the macro you wish to remove from the Macro Name listing in the Macro dialog field. Select the Delete key on your computer. Select Yes from the pop-up dialog that displays.
Visual Basic Editor method:
From the Ribbon, choose the Developer tab and then the Code category. Select the Visual Basic button in the Code category of the Developer pane. Macros may be found under the Tools section. Choose the project from the Macros In drop-down list within the Macros dialog pane to remove the macro. Use the Macro Name field to pick a macro. To delete an object from your listing, click the Delete option. From the File submenu, choose Close and Return to Microsoft Excel.
Removing and Formatting Checkbox in Excel
To remove a single checkbox, choose it and hit the Delete button.
Navigate to the Home pane, after which the Editing group, to remove all of the checkboxes at once. That is followed by selecting the Go To Special option, selecting the Objects radio button, and clicking OK. All the checkboxes will be selected, and you can easily eliminate them by pressing Delete.
When utilizing the last approach, be aware that all of the current sheet’s items will be deleted (checkboxes and buttons included), so be cautious.
Despite its limited customization options, some tweaks may still be done to the Check Box Form control form. If you want to change the formatting settings, you may select Format Control from the context menu that emerges after clicking the checkbox.
You may choose the appropriate Fill and Line color and style on the Colors and Lines page:

There are no additional formatting options for the Check Box Form control. Using a Check Box ActiveX control provides more choices, such as allowing you to specify your preferred font types, and text size.
Checkboxes may be sized using the Size tab, as the name indicates. Checkboxes may be locked or unlocked using the Protection option, and protecting the sheet is necessary for the lock to work.
You can move a checkbox across a sheet using the Properties pane. By default, moving and resizing check boxes are tied to the cell in which you’ve put them.
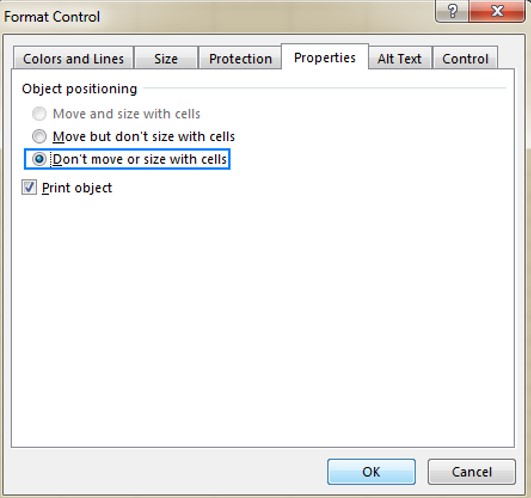
In order to maintain a checkbox in the spreadsheet where you intend it, utilize the Don’t move or size with cells feature. The checkbox will remain in its current location, regardless of how many cells, rows, or columns you insert or remove.
Choose the Print object box in the Print worksheet dialog box if you prefer the checkbox displayed when printing a spreadsheet. Alternate wording for a checkbox may be entered on the Alternate Text tab. Checkboxes have a default label name that is identical to their captions.
Activate 3-D shading to give the tick box a unique appearance. To attach a checkbox to a specific cell, type the cell location in the Cell link field and press Enter.
Conclusion
In some instances, you may wish to utilize a button to access a specific worksheet. It offers several advantages when dealing with a large amount of data. On the other hand, the buttons may be redundant after your job is complete, so you may wish to remove them. This tutorial on how to delete button in Excel should assist you.