
How well your Wi-Fi connection works is directly related to the intensity of the wireless signal. You might be curious on how to check WiFi signal strength Windows 11. If you’re using Windows and have been having connectivity issues, such as sluggish download speeds or repeated network drops, you should first verify that your Wi-Fi signal strength is adequate.
Several methods exist on a Windows PC to determine the strength of the wireless connection. The Taskbar and the Settings menu are two options. Here we will go over each method for determining the quality of your WiFi connection.
How is WiFi Signal Strength measured in Windows 11/10?
Decibel milliwatts (dBm) are the standard units for gauging the intensity of a WiFi signal. As a point of comparison, one milliwatt is used to calculate the power ratio in dB.
In general, your wireless router’s signal strength should be between -55 dBm and -75 dBm, however, this can vary based on how nearby or far you are from it.
Let’s say you’re within the same room as your wireless router, but you’re still having connection issues. It’s important to realize that the wireless network is susceptible to interference from other wireless networks and other electrical equipment in the vicinity.
Process of Checking WiFi Signal Strength in Windows 11
How strong your Wi-Fi signal is may be tested in several different ways.
- Using Taskbar Corner, you can see how strong your WiFi connection is.

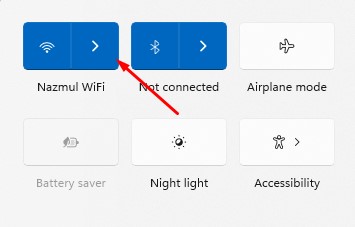
- Inspect the WiFi signal strength in the toolbar’s “Quick Settings”.
- In the WiFi network’s settings, look at the signal strength. Checking the signal strength requires going into the settings and then selecting Network & Internet.

- WiFi signal strength may be inspected in the control panel’s Network and Sharing Center.
Simply type “Control Panel” into the search bar and click “Open” to access it.

The next step is to head into the Settings menu and choose the Network & Internet section.
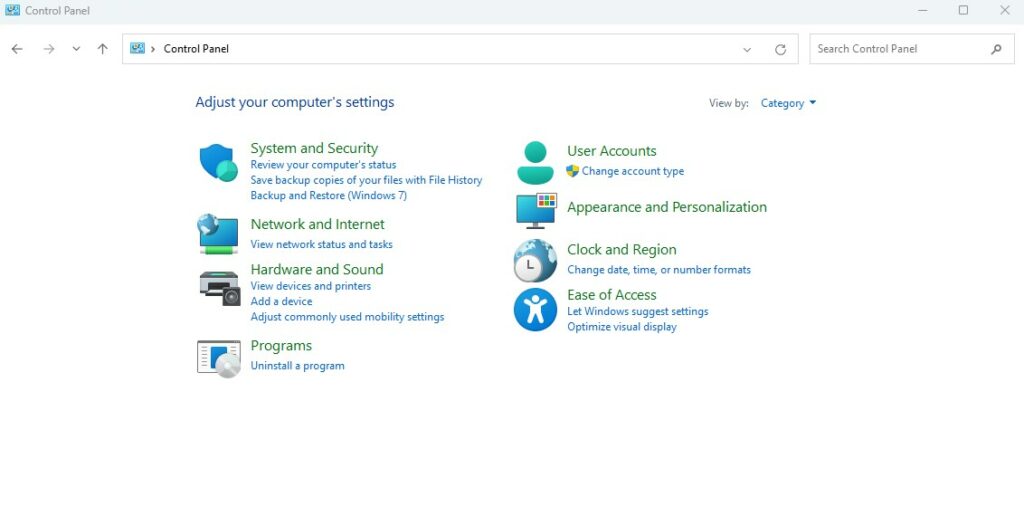
The next step is to go to the Network Sharing Center and choose View network status and tasks.

Once you do, you’ll be able to see how strong your WiFi connection is.

Alternative Methods of Checking WiFi Signal Strength Windows 11
If you want to verify your WiFi signal strength using a different way than the ones built into your operating system (Taskbar, Settings, and the Control Panel), then try the ones listed.
Using Task Manager
You can learn a lot about your computer using the Windows Task Manager. To see how strong your present Wi-Fi signal is, you may utilize it for that as well. See below for instructions on how to proceed.
- The Task Manager may be accessed by pressing the corresponding keys on your keyboard.
- In the second step, select the “Performance” menu item on the left side of the window.

Select Wi-Fi, and then examine the bottom of the screen to see how strong the signal currently is.

Using Command Prompt
The command prompt, often known as CMD, may be used to determine the actual strength of a wireless connection. Here are the measures you should take to accomplish your goal:
- Click the Start button, then type CMD into the search bar that appears.
- Choose Run as administrator from the context menu that appears after clicking on it.
- Click “Enter” after typing this command into CMD:

If you use this command, you’ll be able to view specifics about your WiFi connection, such as signal strength.
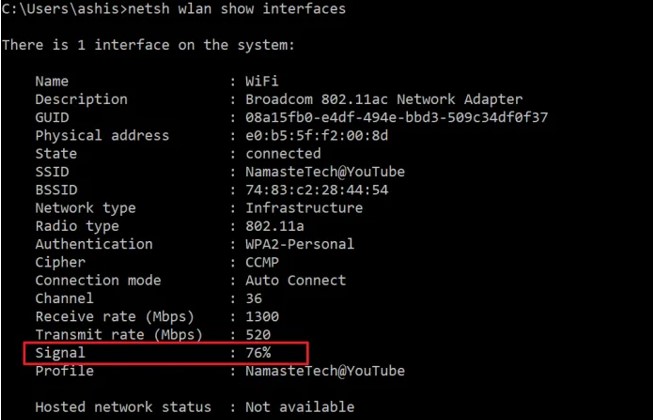
Check out where it says “signal” in the text. Percentage-based information is displayed next to it. That’s how strong the WiFi signal is.
WiFi Analyzer
You may use the built-in Windows utilities or download a third-party application to test the signal strength of your wireless network. The WiFi Analyzer is a free tool like this that can be found in the Microsoft Store. In addition, a more advanced “pro” version is available.
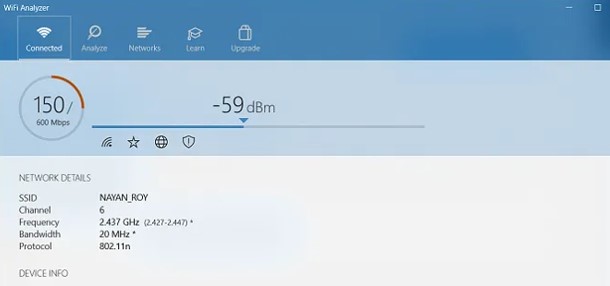
Use this diagnostic instrument to zero in on the source of your WiFi issues and zero in on the optimal channel for your router. In addition, you can examine the local networks that may disrupt your own. Extensive documentation on the router/AP may be accessed. Moreover, the strength and speed of your WiFi connection may be evaluated.
Furthermore, the pro edition comes with a ton of extra features. You may use filters to narrow down your search results, switch to a new network with a single tap, and even utilize a beeper to gauge your signal strength, among other things.
inSSIDer
You may try trying something like the inSSIDer. And it’s also one of the finest ways to see how strong your WiFi connection is on a Windows computer. It examines several aspects of your WiFi setup, such as the channel, security, signal strength, and influence of nearby WiFi networks.
Then, it provides a sufficient report detailing the steps you may do to boost your WIFI’s signal strength. That means you’ll never have to deal with a sluggish WiFi connection or spotty service again. The software is available at no cost. One caveat, though: in order to use it, you’ll have to sign up for an account.

NetSpot
NetSpot is an alternative Windows app for gauging WiFi signal strength. This program is compatible with both Mac and Windows and is used to conduct wireless site surveys. You may quickly begin measuring your WiFi signal with just some few clicks.

The most useful feature of this app is that it makes a graphic representation of the available WiFi hotspots. You’ll be able to map out areas where there is no or very limited WiFi service. You may then change the load on each channel or move your router to provide optimal WiFi coverage throughout your whole home or workplace.
Even though the program is available for no cost, the bare-bones edition lacks some of the more advanced tools. In any case, if you have special requirements, you can always upgrade to a more expensive plan.
How to Check WiFi Signal Strength Anywhere at Home
The strength of your Wi-Fi signal in different rooms might help you decide whether or not to update your router or purchase a mesh Wi-Fi system. Using a smartphone application, you can easily monitor your router’s WiFi signal strength.
Check WiFi Signal Strength with iPhone
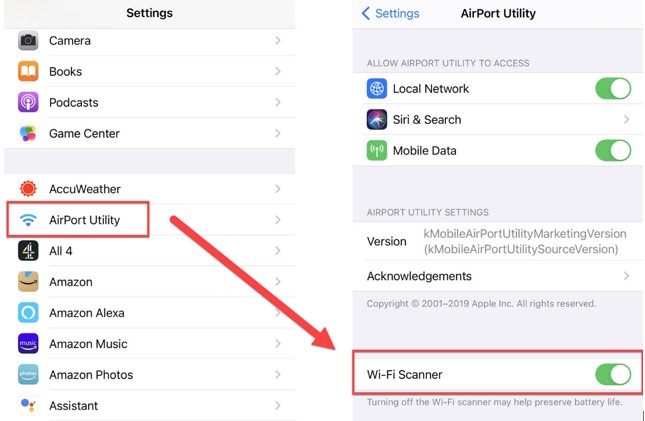
AirPort Utility may be downloaded from the App Store. It’s free, and it’s manufactured by Apple. When it is finished installing, navigate to the Settings application and look for Airport Utility. To activate the feature, press it, then select Wi-Fi Scanner.
Once you’ve launched the AirPort Utility itself, look to the upper right for a blue Wi-Fi scan option. If you have an iPhone, you may use the Scan button to display a list of nearby Wi-Fi networks.
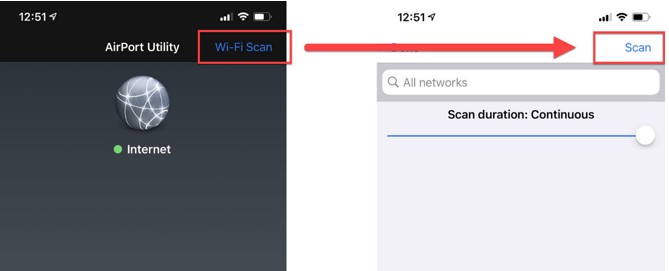
The values will evolve over time because continuous scan is always enabled by default. The Scan Duration slider allows you to restrict data refreshes to a certain time range. It’s a good idea to examine the RSSI value of your own network (that is likely not the best in the world).
As you can see in the graphic below, my mesh Wi-Fi setup causes all of my devices to share the same network. A single router may show up twice or even three times if it supports multiple “bands,” or frequency ranges. Both 2.4 and 5 GHz networks may be transmitted by most routers.
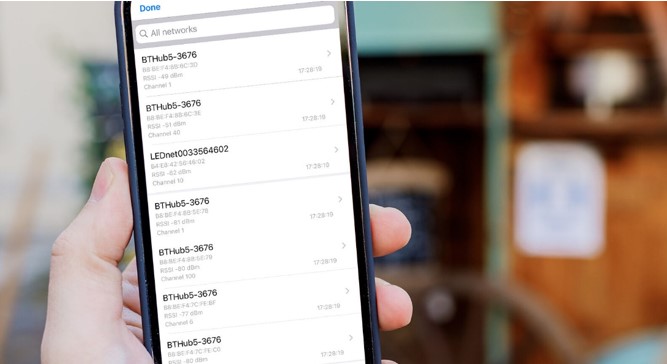
The strength of the Wi-Fi signal depends on your proximity to the router. Proceed to the location where you want to receive a strong signal, and check the reading to ensure it is -65dBm or above.
Check WiFi Signal Strength with Android
Get the Wi-Fi Speed Test app from the Google Play store on your Android device. We like it since you can also use it to check the speed of the wireless connection between your phone and your router, not just your Internet connection. The fact that it displays the intensity of the signal, however, makes it beneficial in this case.

Airport Utility for an iPhone displays a list of all available Wi-Fi networks, however this app just displays the one to which your phone is now connected. This might be seen as useful as you presumably care just about your home Wi-Fi network.
The very first thing you must do is check if your mobile device is linked to the desired wireless network. The next step is to launch the program. Signal strength, which is shown at the top and updates as you move the phone around, is dynamic.
In case you were wondering, there are actually two tabs. The Wireless Network Details panel may be accessed by swiping right from the home screen. While the data remains static, you may refresh it by tapping the button in the page’s footer whenever you travel to a new place.
Since many routers and mesh Wi-Fi systems utilize the same network names for both bands, it might be difficult to discern if your phone is connected through 5GHz or 2.4GHz until you reach this page.
The stated link speed might be helpful because it indicates the theoretical top speed for that connection. However, this will change with time.
Always keep in mind that the range of 2.4GHz Wi-Fi is greater than that of 5GHz. If you want to see how well your signal holds up in the garden or somewhere far from the router, you’ll require to ensure your phone is set to the 2.4GHz network.
FAQs
How Can I Boost My WiFi Signal at Home?
Do Internet Booster Apps Work?
What is Wi-Fi sense Windows 11?
Final Words
Examining the Wi-Fi signal quality on your Windows 11 machine might reveal the source of the problems and lead you to a solution. If the Wi-Fi signal strength is poor, your Windows machine may frequently lose connection. If you want to get the most of your Internet connection speed or increase it, learning how to check WiFi signal strength Windows 11 is essential.