
When you are dealing with loads of work, you need faster internet speed. You won’t like it if your internet is slow and it drains your energy!
And so, it is always better to fix the slow internet on Windows 10 before you get annoyed with fire! And we are here to help you out!
We have brought the best three methods for fixing the slow internet on Windows 10 by making it faster for you. Check out the processes and have fun using your PC!
Methods of Making the Internet Faster on Windows 10

LSO Disabling
If you have a lot of background, you can never ignore the background apps. If you have a lot of background apps working, you can expect your internet speed to get slower.
If you want amazing network speed, you can rely on the LSO. LSO refers to the Large Send Offload. And all you can do to prevent the internet lag is to stop the LSO!
Step 1: Running the Program
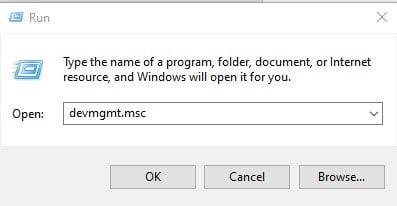
First of all, you have to go to the Windows Logo Key. Here is a trick to follow. While you are pressing the Windows Logo Key, press R along with it.
Here, you will get a new box named RUN. In the OPEN section, you have to write devmgmt.msc. Now, you have to click OK.
Step 2: Disable the LSO
After doing this, you have to go through the NETWORK ADAPTERS. Here, you will find an option named YOUR NETWORK ADAPTER. 
After that, check the tabs and find ADVANCED. Press it and go to the LARGE SEND OFFLOAD V2. There are two options or so named nearly the same.
Make sure you pick IPv4. Now you are free to disable it. On the right side, there is an option named VALUE. There, you have to set it to DISABLE.

Step 3: Faster Internet Speed
Now your LSO has been disabled and you can connect to the internet as your will. You will see that your internet speed is the fast you have never seen.
You can read our another relevant article of One or More Audio Service Isn’t Running.
How to Increase Your Internet Speed on Windows 10
Wi-Fi Drivers Updating
In some cases, you might need to change the network adapters. There are times when you use outdated Wi-Fi drivers. It might fix the network speed.
if you are somebody who is not much updated to work on these skills, you can also manually do it.
For updating the drivers in an automatic manner, you can go for Driver Easy. There is a PRO version of it if you want to deal with it professionally.
It is easier to work with if you have the PRO version. Or you can also have faith in the FREE version.
Step 1: Download and Install the App
To make the slow internet speed on Windows 10 faster, first of all, you have to download the Driver Easy app.
Then, you have to install the application with the methods given by the app.
Step 2: Scan the Drivers
Now, you have to run the app. After you run it, you have to go through the SCAN NOW option.
With the help of this app, your computer will get scanned. If there is any problem with the PC, it will easily detect it.
Step 3: Download Drivers
Now that your device is scanned, you have to press UPDATE ALL. There are some drivers in your system that are out of date.
This option will help you by automatically downloading the drivers.
The best part is, this app helps in downloading the correct version of the drivers. As a result, all the drivers will get updated windows automatically.
Step 4: Restart the PC
Now, you can easily check if all works properly by restarting the computer.
If you have any slow internet issues in your Windows 10, this will solve it completely. You can have a better speed after doing this process.
Bandwidth Settings Adjusting
If you see Windows 10 internet speed capped, the reserved bandwidth can be the reason. When you are connected to the internet, Windows 10 will reserve some bandwidth for the system apps.
Some bandwidth is also reserved for the Windows Update. This is a built-in system. As a result, the other percent of bandwidth will work for the regular Internet work you do.
But we do not update the Windows regularly. As a result, the reserved bandwidth will slow down your computer when you use the internet.
And if you can reduce the limit of the reserved bandwidth, you can easily get out of the difficulty!
Step 1: Task Manager
First, go to your desktop. You have to press Ctrl+Shift+ESC jointly. After pressing them together, you will see a taskbar will show up.
Step 2: Check File
In the task manager, you have to check the upper left portion. There is an option named FILE.

Step 3: Creating a New Task
Click the File Option and among the other options, press RUN NET TASK. When another new taskbar emerges, you will see a place for typing. You have to type gpedit.msc in that box.

Step 4: Administrative Permission
Check below where you typed. There is a box for ticking. It says “Create this task with administrative privileges.” Ensure that the box is ticked there. And then, you are free to press OK.
Step 5: Limit Reservable Bandwidth
Now, you have to check the COMPUTER CONFIGURATION. Here, you will see ADMINISTRATIVE TEMPLATES.
Press it and then among the other options, you have to press NETWORK. Then, go for QoS Packet Scheduler.
After you are done, you will see several options on the right side of the window. Pick up LIMIT RESERVABLE BANDWIDTH. Now, double-click it to make it work!
Step 6: Set the Limit
After you are done with the previous process, you will see a window. There will be three options in the upper left portion.
There is an option of ENABLED, DISABLED, and NOT CONFIGURED. You have to press ENABLED and then you will get an option to choose the limit.
All you need to do is set the Internet Bandwidth limit to “0”. Now, you have to click APPLY and then OK.
Step 7: Enjoy Fast Internet
And when you have completed the process, you will see your internet is working much better than before.
The process is a little complicated and lengthy. However, this works for almost all the PCs and works the best among other methods. You might be interested on USB access denied windows 10.
Wrap Up
Internet lags can make your work lengthy. And if any other process of making the internet faster didn’t work before, don’t worry! The methods we have explained will surely work.
Try them and let us know in the comment section about the one that worked best for you. Don’t forget to mention if you have other tricks to make the internet speed fast.