
Changing headings or headers is easy. But if you are a beginner, Word must be difficult for you. And when it comes to removing the headings one by one or all together, it gets more mind-numbing!
And for beginners in Word, we have some easy methods for you. If you want to know how to remove headings in Word, these easy steps can help you out!
There are five different methods we will talk about today. There are also other methods of deleting headings, but these are the easiest ones on the list! Check them out!
Methods of Removing Heading in Word

Apply Normal Style
When you check the headings of MS Word, you will get several heading types.
From Heading 1 to Heading 9, you will get to use and change the headings as per your requirement.
Step 1: Normal Text Idea
The first option of all the headings is the NORMAL TEXT style. This option will help you to write the texts in the normal style.
You can apply this style and switch from the other heading styles to the normal text. With the help of using this style, you can remove the other heading properties too.
Step 2: Select the Heading
Here, you must select the text or the portion you want to change from heading to normal. You can also select several headings if you want to change them altogether.

Step 3: Go to Styles
After selecting them with your cursor, you have to check the tab STYLES on the HOME, which is situated on the upper portion of Word.
There, you will see different options; the first one from the left will be NORMAL.

Step 4: Removing Headings
When you have selected NORMAL, the Word will automatically remove the headings you have selected, and it will replace them with normal texts just like the other part of the paragraph.
Step 5: Change the Entire Text
In this case, you might want to remove the headings from your entire Word file.
If you want to do this, you can follow a shortcut method without selecting each of them manually.
Press CTRL+A. The whole text of the content will get selected in this way. And then, you have to go through Steps 3 to Step 4.
As a result, the whole text will change into a normal style.
Note: But in this situation, you must keep in mind that this process will change all the other formats, like BULLETS, ITALIC, BOLD, UNDERLINE, NUMBERED LIST, etc, into normal text.
Different Headers On Different Pages-Microsoft Word
Removing Heading with Dialog
You can also check this out if you want to change the heading to a normal text word. This is the Styles Dialog box method for deleting the headings. You might be interested in Microsoft Word Won’t Open Windows 10 & Mac.
Step 1: Finding the Dialog Box
When you go through the Word file, you will see that there is a dialog box for headings in the top section.
In this dialog box, you will get different styles of headings. With the help of this dialog box, it is easy to change the heading.
You can change one heading to another style heading. Also, you can change it to normal text. If you want to clear the formatting for all the texts, you can do that too.
Step 2: Open Styles Dialog Box
First, you have to mark the text or heading that you want to return to normal text. Highlight the part or select it.
Now, you have to press Alt+CTRL+SHIFT+S. With the help of this short form, you will see the Styles dialog box.

Step 3: Clear All Headings
Now that you have seen the several styles of heading, you can easily change them to normal text.
The best part is you will see an option named CLEAR ALL here. With this option, you can remove all the headings from your content.
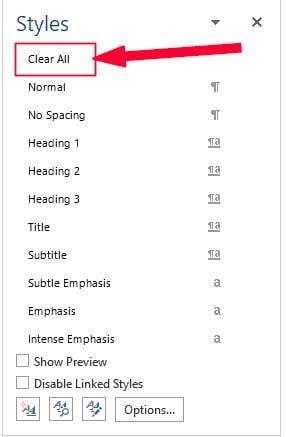
After clicking it, all the headings will be removed, and you will only see the normal texts.
Removing Heading from Navigation Pane
You can also let Word remove the heading from the navigation pane. Make sure the Navigation pane is visible in your Word.
Step 1: Getting Navigation Pane
If you don’t see the Navigation pane, you need to go to the VIEW option at the top of the Word.
When you get several options, put a tick mark on the NAVIGATION PANE to see this option.

Step 2: Go through the Headings Option
In the Navigation Pane, you will see the HEADINGS option along with the PAGES and RESULTS. It will show all the headings there.
Related: How to Fix Page Numbers in Word.

Step 3: Delete the Heading
On the headings that are shown in the Navigation Pane, you can right-click and do whatever you want.
By right-clicking, you will see various options. There is a DELETE option to delete the heading. Press if and will no longer see the heading there!

Clear All Formatting Command
You can also settle for the Clear All Formatting command if you want to. This will help in clearing all the headings.
- In the first place, you have to select or mark the heading or headings you want to change.
- Now you have to go to the HOME tab first. There, you will see a group named FONT.
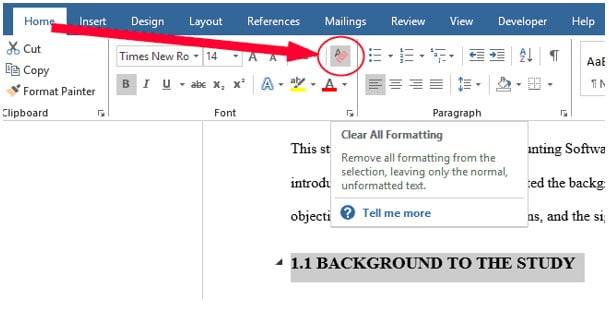
- Get into FONT and search CLEAR ALL FORMATTING icons. After you get it, press it.
- This will clear all the headings from the selected area and provide you normal texts.
Note: Just like the previous method, this will also remove other formattings like BOLD, LISTS, UNDERLINED, etc. So, before selecting, check, and double-check it.
Remove Header Command
Step 1: Click INSERT
If you want to delete the headers, you can use this easy method. First, get inside the Word file; there, you have to look at the top tab.
In the top tab, you will find an option named INSERT. Click the INSERT option.
Step 2: Header & Footer
Now that you have clicked it, you will see the HEADER & FOOTER section there. All you have to do is go through the HEADER button and press it.
Step 3: Remove the Header
As a result, you will get a new box of options. Check the bottom part of the box. There, you will see an option called REMOVE HEADER. This is all you are searching for. By clicking it, you can remove the header in your MS Word!
Remove All Headers
There are times when you don’t want to remove the headers one by one. This might be time-consuming. As a substitute, you can rely on removing all the headers with some clicks!
- First, you must go to the header area and double-click it. As a result, that will be editable for you.
- Now, you have to select the part of the header in your content. After selecting, press the delete on your keyboard.
- You will see that the header is gone. And along with this, all the headers will disappear too from your content. This method is faster than the previous method.
Wrap Up
We are sure that if you are a PRO working in Word, these are the known facts to you. However, beginners in Word might be very helpful with these easy steps for removing the heading styles.
So, which method do you use for removing headings in Word? Please share with us in the comment box!