
Justifying the text in a line is quite crucial in the context of every document you ever write on MS Word. By performing this task, you can align the text of any line or paragraph with both the left and right margins. While doing so, the gaps between two words sometimes become too much wide, which is unacceptable.
The wide gaps can be avoided while doing so if you rightly learn how to justify text in word without spaces. Wide gaps between words and sentences are never expected as they destroy the beauty of articles and paragraphs.
The Reasons Why You Should Justify the Text in Word Without Spaces
With the help of this justifying technique, the lines of your article will achieve the perfect symmetrical shape. But the question is obvious to rise in your mind about the justification of text in a line. Even if you justify the text, why the wide gaps appear between the words and sentences right after this action.
You will get all the answers to these questions above by going through the part below:
- To align the text in a line both on the left side and the right side
- It is necessary for avoiding wide spacing issue between two words of a particular line
- Average-spaced and both sides aligned text looks symmetrical and pleasing to the eyes of the reader
How to Justify Text in Word Without Spaces – The Procedure You Need to Follow Step-by-Step
For understanding how to justify text without big spaces in word 2016 or the other versions, you don’t have to study rocket science. But following the correct procedures with maintaining the proper steps is necessary, like in every other case. Because if you apply the wrong actions, even the smallest of problems will seem the toughest.
Now, it’s time for taking a close look at the must-to-follow steps for justifying text in word without spaces:
Step-1: Choose and Select the Desired Text Part
The first thing you need to do is make sure text from which part of the article, para, or line you want to justify without big spaces. Take your mouse cursor just above that section of which you want to select. Then keep pressing the right button and go downward and sidewise as much you need to cover.
Stop when a gray shade appears above the selected phase of the article. That’s how you will have to select the text for further adjustment about spacing and alignment.
Step-2: Enter the Paragraph Section and Fix the Alignment
After selecting the desired text section, you will have to click the right button from your built-in or externally connected mouse. A small bar with various options will appear at the right side of your selected text and cursor position.
At the end of that options tab, there will be one named “Paragraph Options,” and you need to click on it.
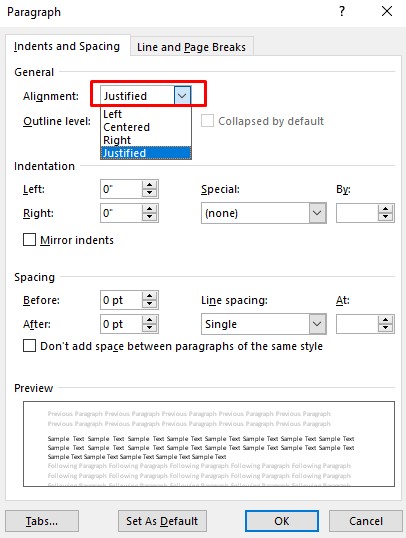
Thus, you will be directed to the “Paragraph Options” section with various alignment and spacing options. In this part, the first section will be named “General” with a sub-section called “Alignment.” Right beside this sub-section, there will be an empty box with a drop-down icon at the right of the box.
Click on the dropdown menu icon, and five alignment options will be revealed within the snap of fingers. Those five options will be named “Left,” “Center,” “Right,” “Justified,” and “Distributed.” From these options, you need to select the fourth one, which is “Justified,” and make sure of this option to fill the empty box.
When these are done, gently press “OK” from the bottom-right part of the “Paragraph Options” window.
Step-3: Enter the Font Kerning Settings and Fix the Wide Spacing
As you will set the text alignment as “Justified,” you will see the lines have aligned from both sides, but a serious problem has arisen. That is too much wide space between the words of every line you just aligned a while ago.
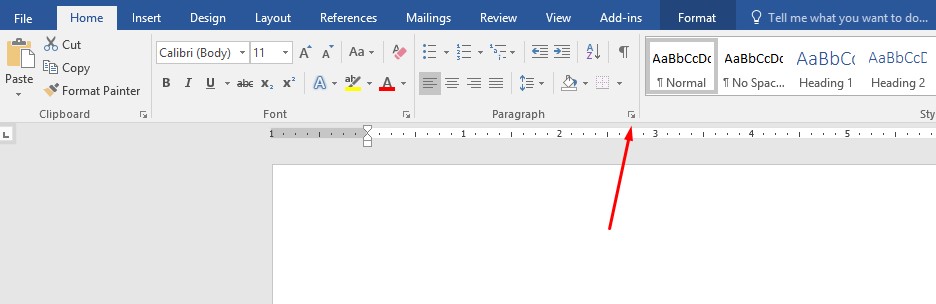
To fix this issue, the lesson of how to justify text without big spaces in word office 365 with all versions will come into the game. At first, locate the tiny arrow beside the “Font” section right above the texting part. Obviously, you need to click on it to access the “Font Kerning Settings” section.
A new dialogue box containing “Font Settings” will immediately pop up on your screen with “Font” and “Advanced” options. Go to the right side named “Advanced,” and in there, you will see the advanced fonts and spacing options to work with. You need to keep the “Scale” at 100%, and “Spacing” as normal should do the job.
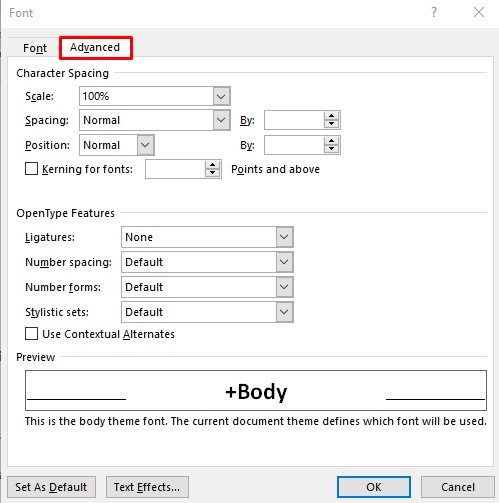
But you need to keep applying the “Expanded” and “Condensed” options as well to check which suits better with text. You also need to play a bit with the “Position” section to find the most suitable one for your usage.
FAQs
Why are there gaps between words after I justified the text in MS Word?
Should I increase the font size to cope up with the wide spacing between words after justifying text?
Read More: How to Insert Page Number in Word from Specific Page
Final Thoughts
Spacing and alignment might have suffered you a lot while writing a document in MS word. Even if you have set the alignment as “Justified,” the gap between words might have widened a lot. It may give you a severe headache even after being the simplest of problems if you don’t know how to fix them.
That’s the reason it becomes way crucial for you to know in detail about how to justify text in Word without spaces. The discussion above will come in great assist by helping you in the first few attempts. Later, you will be able to perform this efficiently without the help of anyone.