
As we know, bullets are for making the contents of the document and article clearer and more precise. You may not like the traditional roundish or other commonly used bullets. In place of that, the square bullets might be your favorite to use in the articles to define contents serially.
But you might have some trouble with how to add square bullets in word when you are trying to implement it for the first time. There are various square bullets that you can use, like hollow, small black, small white, and shadowed-white square bullets. You can implement any of these based on which matches your content.
How to Add Square Bullets in Word – The Steps That You Must Follow
Adding the square bullets is not rocket science, but it can become your headache if the right path isn’t followed. The steps you need to take to implement square bullets in your document are:
Step-1: Choose the Text on Which You Want to Apply Square Bullets
The first task is obviously choosing the part of your document on which you are about to add the square bullets. Then, after choosing, you need to select those parts by using the mouse or touchpad of your laptop or computer.
Step-2: Access to the Bullet Library
When you are done selecting the desired portion of the text, you need to access the “Bullet Library.” To do so, locate the “Paragraph” section from the top menu bar of the MS Word window in which you are writing. In this section, the first symbol will be the “Bullets” that you were searching for.
After locating it, you will find a small dropdown icon just below the “Bullets” symbol. As you click on it, the “Bullet Library” with various bullet options will be in front of you.
Step-3: Implementation of the Square Bullets
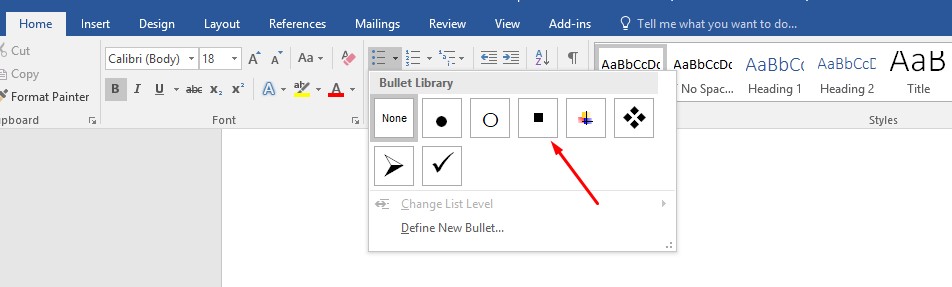
Now, in this “Bullet Library,” you will find various bullets type along with the square ones. In this library, you will find three square bullets in the first phase. The first two square bullets are small, and their names are “Small Black Square Bullet” and “Small White Square Bullet.”
The third bullet from this phase is a regular-sized one named “Lower-Right Shadowed White Square Bullet.” You can use any of these square bullets based on the necessity of your document. After selecting the text, just click on your desired square bullet, and that square will be added to your desired text portion.
Step-4: Add Hollow Square Bullet
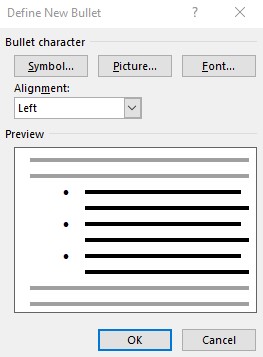
There is another popular square bullet that you can use from another part of this “Bullet Library.” As you are in the library of bullets, there will be an option above the list of all the bullets named “Define New Bullet.”

As you click on it, a small new window will appear containing various options under the “Bullet Character” section. The first option of this section will be “Symbol,” and you need to click on it before pressing the “OK” button.
As you appear in a new window full of symbols, change the font category to “Wingdings.” In this symbol category for bullets, you will find the “Hollow Square Bullet” in the first row.
Then you must select that commonly used hollow square bullet and press “OK” from the bottom of that window.
By doing so, you will apply this particular square bullet to the desired and selected text portion of your document or article.
Learn More: How to Add Check Mark Bullets in Word
Step-5: Add Square Bullets by Inserting Pictures
It sounds pretty interesting to add square bullets by inserting pictures, right? But you can easily perform this from the “Define New Bullet” window, where we went while adding the hollow square bullet. From this section, select “Picture” as the “Bullet Character” type, and then press “OK” to get things going.

Then, you will be directed to the “Insert Pictures” page, where you will see three different sections. The first section indicates about inserting an image from your device if you have downloaded the desired square bullet image earlier. If you don’t have any downloaded ones, you can use the “Bing Image Search” option.
With the help of it, you can search the square bullet images online as well to look for the desired one. The results of the search will be on the same page as well, where there will be various relevant square bullet images. Choose your favorite one, and click on “Insert” to add that preferred square bullet to your text.
You can also preserve your favorite square bullet images in the “One Drive” connected to your Microsoft account. Then, if necessary, it will be a whole lot easier to import and use the square bullets from this “One Drive” section. You can know more posts on bullets, How to Add Sub Bullets in Word.
Final Thoughts
Adding square bullets will provide quite a unique look to your article rather than the traditional bullets. But the first thing for you while trying to perform this action is to learn how to add square bullets in word. Then, when you gather proper ideas about it, it will be easier to try out various methods of implementing square bullets.
You will find various square bullets in the “Bullet Library” section to apply to your article. At the same time, it is also possible to import square bullet images to MS word and add them to the document you are preparing.