
When updating the version of the Windows Operating System of your PC, getting the windows could not update the computer’s boot configuration message can down your courage. A number of users all over the world faced this humiliating issue which caused a massive amount of worktime for them.
This terrible mix-up can appear when you try to perform an in-place update using the Windows Media Creator. Using a USB or a DVD, in this case, can also be highly responsible for this unwanted problem. But not many reasons to worry as we are here with the solutions to this mess.
The Possible Reasons Behind Windows Could Not Update the Boot Configuration of the Computer
This error regarding the boot configuration, unfortunately, happens during the updating period of the Windows OS. As it can’t suddenly show up out of nowhere all by itself, there are several reasons which are the culprit. The possible reasons that can push you into this deep pit of trouble are:
- The first suspect of preventing the update of the boot configuration on our list is the broken Boot manager utility
- If windows could not prepare the computer to boot, it is highly possible that the UEFI is enabled

Windows Could Not Update the Computer’s Boot Configuration – How to Fix It
One of those two reasons above is the culprit of your suffering regarding the boot configuration update error. Once you get familiar with the root of the problem, the path of fixing the issue becomes way easier. Now, we have some effective and tested methods of fixing this irritating and unbearable problem.
To solve this update related issue of your computer’s boot configuration, please go through the fixing methods below:
Method-1: Repairing of the Boot Manager
The broken or damaged boot manager will indeed prevent the updating of the computer’s boot configuration. If this is the root of the error, you need to repair the boot manager of your computer as early as possible. The steps to follow for you to do it are:
Step-1: At first, you need to right-click to the Windows Start Menu located on the bottom-left corner of the screen. An options panel will appear there, and you will have to choose the “Settings” option from that panel.
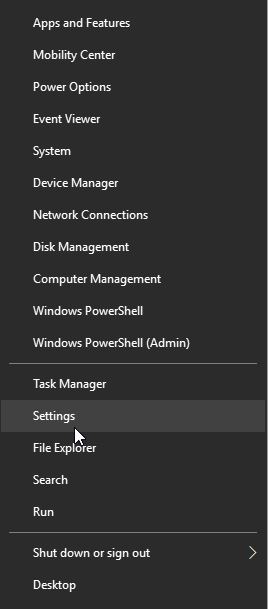
After entering there, you will see several settings-related options, and you need to find out the “Update and Security” panel. It will most likely be situated at the bottom of the options list, and you will have to double-click on it.

Step-2: As you will access that section, locate the “Recovery” tab and then select it. In this part, there will be a sub-section called “Advanced Startup” with an option bar named as “Restart Now” below. Click on it, and the boot task will start within the Advanced Startup Options mode.

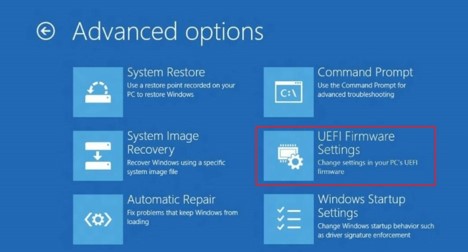
Step-3: The task you need to follow is accessing the Advanced Options of Troubleshoot. There will be about six advanced options on your screen, and the Command Prompt option is the desired one among those. Click on it instantly, and as you do so, a dark blank page will appear.
In that blank page of the Command Prompt, you need to type bootrec /RebuildBcd, bootrec /fixMbr, bootrec /fixboot commands one after another.
Then hit the “Enter” button to execute these commands successfully. The successful execution of these commands will never allow any disruption during the computer boot. As a result, you will be able to update your computer’s boot configuration without any further delay.
Method-2: Disabling the UEFI in Boot Options
The UEFI stands for Unified Extensible Firmware Interface, and if it is enabled, it can prevent updating the computer’s boot configuration. Disabling this option will possibly let you update the boot configuration. By following the simple steps below, you can disable the UEFI in Boot Options:
Step-1: Like the previous method, you need to access the Advanced options first to disable the UEFI. To do so, at first, right-click on the Windows Start Menu to bring the options panel and select “Settings” from there. Just like before, choose “Update and Security” from “Settings,” and then select the “Recovery” section.
In there, you will find the “Advanced Startup” section having the “Restart Now” button below. This action will instantly reboot your PC to advanced startup with various options appearing on your screen.
Step-2: There will be more or less six options on the blue screen, and in the middle, you will find the “UEFI Firmware Settings.” Then click on it, which will direct you to a new page which will be blue.
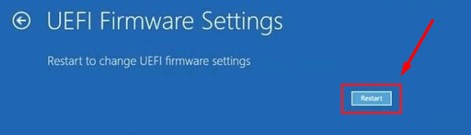
On that newly appearing page, there will be a “Restart” button, and you will have to press on it. As a result of this action, the system will restart, and it will direct you to the UEFI BIOS menu.
Step-3: As you will be directed to the BIOS menu, locate the “Secure Boot” settings first, and then disable it. You will find this option and the disabling menu in the Security tab or the Boot tab and complete the task from there.
Locate the Boot Mode or UEFI Boot from the menu situated under the Boot tab, and change the boot mode from UEFI to Legacy. After completing all these tasks, you need to save them and do them by pressing F10.
Hopefully, after disabling the UEFI, there won’t be any further prevention in the updating of the computer’s boot configuration.
Boot configuration data for your PC is missing or contains errors 0xc000000f 0xc0000034 0xc0000098
Final Thoughts
It is really disappointing when the message windows could not update the computer’s boot configuration appears on your screen and stops everything. Unfortunately, this error occurs during the update of the Windows Operating System. This will prevent you from using many functions of your PC if you don’t take any action quickly.
Getting puzzled by seeing this problem is not abnormal, but keeping yourself cool is also necessary. If you want to solve it, get to the root of this problem and see which reason is the culprit. Then apply our discussed solutions one after another, and hopefully, this error won’t bother you anymore.