
If you are using Windows from the very beginning, you are well aware of Windows’s Confirm delete dialogue box. When you select a file or a folder and click the right button for deleting it, Windows usually want to ensure if you want to delete the item or not.
In most cases, people accidentally delete files. So, Windows added this dialogue box to ensure. However, if you were using the previous Windows 8 operating system or you are new to the Windows 10 OS, you will not be able to see this dialogue box. Why? The reason behind it is people usually complain about this feature being annoying!
But you might want to activate the Windows 10 Confirm Delete dialogue box so that you do not accidentally delete files! And so, we are here to tell you how you can do that!
Who needs Windows 10 Confirm Delete?
The default behavior of Windows is fun. Who needs to double-check when it comes to deleting a file? On the other hand, you are always free to restore the deleted file if you accidentally deleted something. All you need to do is go to the Recycle Bin and restore it!
Also, when it comes to deleting so many files, you barely need the confirmation message because that can make the process annoying for you! From the Registry files to the text files and the temporary app projects to the movies that you have already watched, you want to delete them without your Windows 10 confirming twice.
However, some people love to confirm it before deleting it. Though in some cases, the ease of deleting a file is fun, some people hate it. Default deleting is for faster action. But sometimes when the file is large, Microsoft can delete it permanently.
In this case, if you delete it accidentally, you can lose your file permanently. In this case, the Windows 10 Confirm Delete is necessary! Also, searching for a file in the Recycle Bin can be maddening. So, how do you enable confirm before delete in windows 10? In this scenario, you should know about it! You can also read ds4 stopped working
Step by Step Process of windows 10 Confirm Delete
If you tend to delete files without even noticing properly, the Windows 10 Confirm Delete dialogue box is very much needed for you. If you want to enable it, go through the step-by-step process we have mentioned below!
Step 1: Show Desktop Icons
If you have Windows 10, you will never have the Confirm Delete option added. And so, when you delete a file, it will automatically be transferred to the Recycle Bin even though you deleted it intentionally or accidentally. Before you get into the process, you have to certify that the desktop icons of your Windows are enabled.
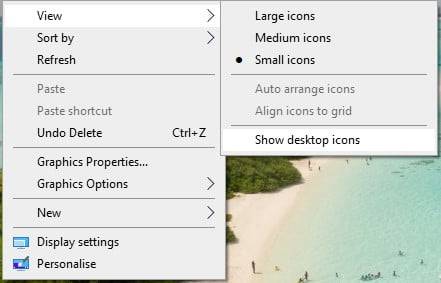
If you do not see the Desktop icons on the desktop, you have to get them first. For doing this, you have to go to the desktop, and there, go for a right-click. There, you will get several options. From the options, you have to select VIEW. From here, you can easily enable the desktop icons by clicking SHOW DESKTOP ICONS.
Enable Delete Confirmation in Windows 10
Step 2: Recycle Bin Properties
Now that you can see all the desktop icons, you will also see the Recycle Bin. All your work here is related to Recycle Bin because you are dealing with the Deleted files and folders. You,
u have to take your cursor on the Recycle Bin icon. Do not left-click it. Settle for the right-click so that you can get options to select. After right-clicking, you will get several options to select from. From the options, you have to select the Properties. Now, you will see a dialogue box of Recycle Bin Properties.
Step 3: Display Delete Confirmation Dialog
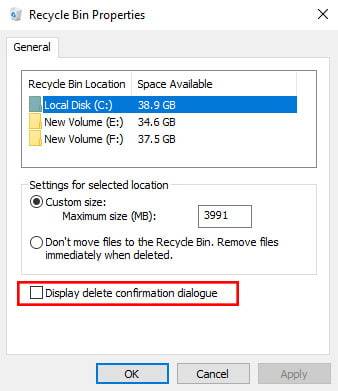
When you reach the Properties dialogue box, you will get numerous options there. There are also so many tabs added. If you look carefully, you will see a tab named General. You have to click the general Tab first. Now, under this tab, you will get some options where you will find an option named Display Delete Confirmation Dialog.
Step 4: Apply
After you get this option, all your work is done! There, you will see an option named APPLY. You have to click the APPLY button there if you want that your Windows 10 to ask permission to delete the file. You have to close the Recycle Bin Properties dialogue box now. You are done! Now, every time you will delete a file or a folder in your Windows 10, you will get a confirmation dialogue box to confirm if you want to delete the file or not!
Step 5: Retrieve
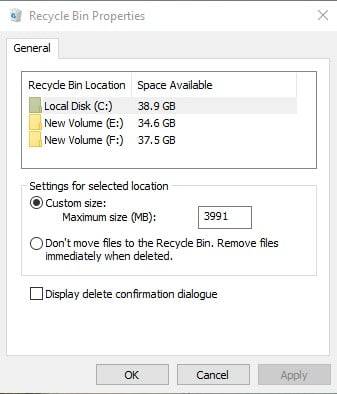
After adding it, there can be times when you will not like the Windows 10 Confirm Delete dialogue box anymore. In that case, you can also switch it off as per your requirement. All you have to do is go through the Recycle Bin Properties again.
Go to the General Tab and switch off the Display Delete Confirmation Dialog. Then, close the Recycle Bin Dialog box and you are done! You will not see the Delete Confirmation Dialog Box again!
Wrap Up
So now, you will never delete an important file or folder without double-checking it! No file will get lost without your permission. The only thing that can ensure this is the Windows 10 Confirm Delete option. All you have to do is go through the process we have mentioned and have fun enjoying the benefits!
The best part about the Confirm Delete option is you can reassure yourself about what you are deleting. However, it is amazing that Windows 10 came up with the option to activate and deactivate the option of this dialogue box because as there are people who like it, there are also people who don’t.
Also, tell us to do you like the Confirm delete dialogue box or not? And why do you like it or why you don’t? Comment below and let us know!