EnjoytechlifeEnjoytechlife
  • Home
  • AI
  • Apps
  • Excel
  • Gadget
  • Software
  • Space
  • Word
Facebook Twitter Instagram
  • Privacy Policy
  • Contact Us
  • Sitemap
Facebook Twitter Instagram
EnjoytechlifeEnjoytechlife
  • Home
  • AI

    Removing Life Events on Facebook: A Step-by-Step Guide

    May 4, 2024

    Winning Charms: Unlocking the Mystery of Online Gamers Lucky Rituals

    April 18, 2024

    ทำไมจึงควรเลือกทะเบียนรถจากเว็บออนไลน์ในยุคนี้

    April 9, 2024

    DUNIA303: Tempat Perlindungan Anda bagi Pecinta Slot Online

    March 20, 2024

    Is Each Spin On Megaways Game Unique?

    March 1, 2024
  • Apps

    Cash Advance Apps That Don’t Use Plaid: A Comprehensive Guide

    December 3, 2023

    How to Block Apps on iPhone: A Comprehensive Guide to App Restriction

    December 3, 2023

    Selling Feet Pics Apps: A Comprehensive Guide to Monetizing Your Foot Fetish

    December 3, 2023
  • Excel

    Create Excel Legend Order Not Changing Its Original Copy

    January 28, 2023

    Learn Why Your Microsoft Excel Not Sorting All Columns Duly

    January 3, 2023

    How To Center a Cell Horizontally in Excel

    November 14, 2022

    How To Assign A Value To A Variable In Excel

    November 13, 2022

    How To Shorten Excel Sheet

    November 12, 2022
  • Gadget

    Leasing a MacBook Pro 16″: A Comprehensive Guide

    August 27, 2024

    Exploring Different Safety Mat Types

    August 7, 2024

    Unraveling the Mystery of Dr. Claw in Inspector Gadget: A Comprehensive Exploration

    December 3, 2023
  • Software

    Streamline Your Workforce with the Best Shift Management Software

    April 21, 2025

    Engineering Software in Education: 9 Benefits for Students and Educators

    March 27, 2024

    How Can a CRM Add Value to Your Organization

    March 25, 2024

    Best Practices in AI Software Development: Your Guide to Success with a Custom Software Development Company

    March 15, 2024

    Is SAS Faster Than SSD?

    February 13, 2024
  • Space

    Unveiling the Enchantment: Explore the Wonders of the Museum of Dream Space

    December 3, 2023

    Plan 9 from Outer Space: Unraveling the Mystery of the Cult Classic

    December 3, 2023

    Trials in Tainted Space Wiki: Unraveling the Galactic Adventures

    December 3, 2023

    Power Rangers in Space: Exploring the Galactic Adventures of the Legendary Heroes

    December 3, 2023
  • Word

    How to Split Pages in Word into Separate Files

    June 20, 2023

    How do I Delete a page in Word that won’t Delete Mac

    May 28, 2023

    How To Get Rid Of Footer In Word

    April 23, 2023

    How to Merge Multiple Pages into One Page in Word? A Complete Guide

    January 2, 2023

    How To Print Gridlines in Word

    December 7, 2022
EnjoytechlifeEnjoytechlife
Home»Word»How to Make Tab Indent Bullets in Word
Word

How to Make Tab Indent Bullets in Word

By RodneyApril 25, 2022Updated:May 26, 20225 Mins Read
Facebook Twitter LinkedIn Telegram Pinterest Tumblr Reddit Email
How to Make Tab Indent Bullets in Word
Share
Facebook Twitter LinkedIn Pinterest Email

The process of making a list in Word may include more than just writing down a list, based on the sort of Word document you’re working on. Custom bullets may be desired to add a touch of flair to your list; alternatively, a list’s style may be defined from the beginning. When it comes to structuring your material, tab indent bullets may be really useful. This guide will demonstrate how to make tab indent bullets in Word.

Table of Contents

  • Process of Making Tab Indent Bullets
  • Aligning Text in Bullet Points
  • Resetting Bulleted Lists
  • Conclusion

Process of Making Tab Indent Bullets

To raise or reduce the numbering level, you may use the Tab & Shift+Tab keyboard shortcuts while creating a numerical or bulleted listing in Word:

reduce the numbering level

Word employs the next level of the numerical or bulleted list supplied by default. The first element may be changed, or all things can be changed. Using the keyboard keys Tab and Shift+Tab, you may quickly and easily create numerical or bulleted lists within Word:

numerical

It’s sometimes necessary to keep the numbering level the same while using Tab for normal tabulation:

numbering

To make Tab & Shift+Tab increase or decrease the numbering degree while working with lists, perform the following steps:

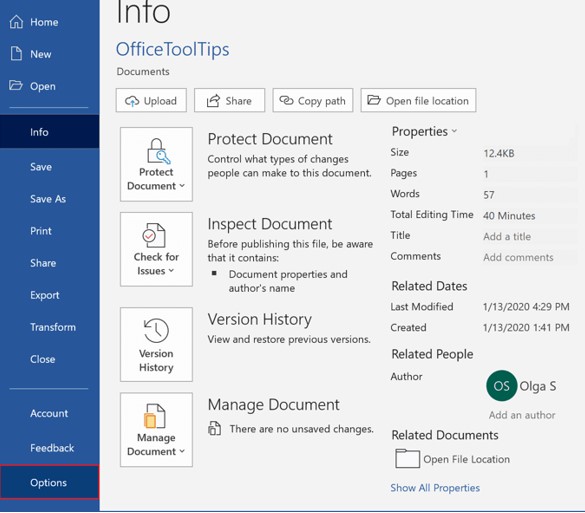
The Options item may be found under the File tab:

option

Access the Proofing section inside the Word Options display window and then select the AutoCorrect Options… box:

Proofing

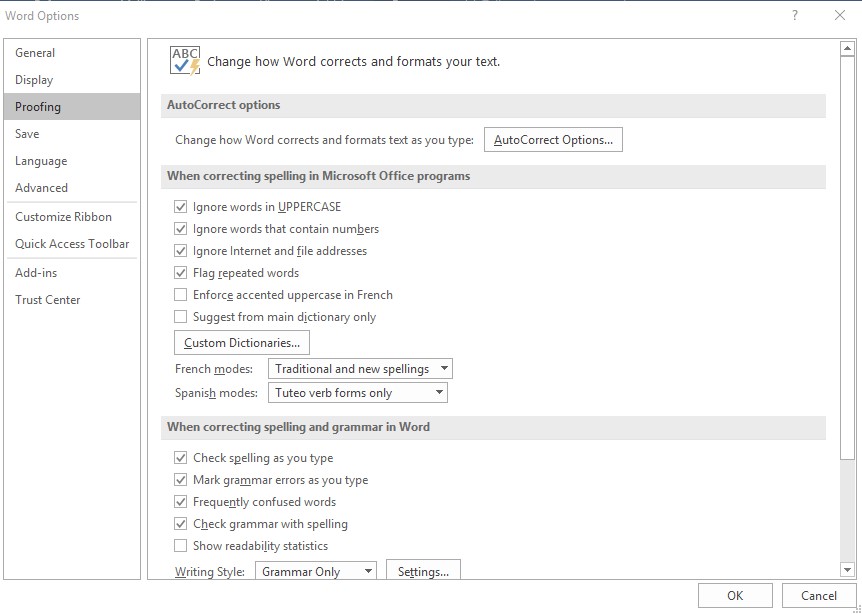
Select or uncheck the AutoFormat As You Type button in the AutoCorrect popup. Tabs and backspaces may be used to set the left and first indents:

AutoCorrect popup

Tab and Shift+Tab may be used to raise or reduce the numbering range if Set left- and first-indent with tabs and backspaces is selected.

Without checking the box, hitting Tab will add tabulation to each row of your numerical or bulleted listing; if it is selected, it will prevent this.

Aligning Text in Bullet Points

It is possible to build customized numerical or bulleted lists with Microsoft Word, however changing the appearance of a listing is not always straightforward. To make a list’s bullets line up with the textual sections before or after them, you should adjust the list’s margin. Change the list’s paragraph options to suit the paragraphs’ paragraph configurations.

  • The bulleted list will be aligned based on where you select within the text. To access the Paragraph context menu, select the dialog launcher inside the Home tab’s lower region. Keep an eye out for the number in the Before Text field under the Indentation tab for future reference. Dismiss the dialog by clicking “OK.”
  • You may do this by clicking on any of the items in the bulleted listing. To access the Paragraph context menu, select the dialog launcher in the Home tab’s lower area.
  • Preferably, you should make this change to align with the amount of spaces between paragraphs that you choose in the Paragraph options. Implement the modifications by clicking “OK” and aligning the listing with the paragraph’s content.

Resetting Bulleted Lists

The bulleted section in the Bullets and Numbering dialog field provides a variety of bullet styles that you may use in your composition. You may change the look of these various bullet forms over time. It’ll display you an estimated representation of what a bulleted list structured using that gallery option would look like when you do. It’s possible that you’ll wish to revert those gallery styles to their default settings at some time. You may accomplish this by following the procedures outlined below:

  1. Using the Format option, select Bullets, and Numbering. A dialog box titled Bullets and Numbering will appear on Word.
  2. This tab should be visible. Ensure that it is. Consider Figure 1 as an example of this. The None selection should be made in the shown gallery styles.
  3. Choose one of the seven alternative forms that are displayed in the gallery.
  4. If the Reset button gets accessible, choose it by pressing the icon. Word prompts you to confirm that you wish to restore the gallery placement to its default setting.
  5. Select Yes from the menu. The style of the gallery place is restored by Word.
  6. Steps 3 to 5 should be repeated for each of the additional gallery styles listed on the page.
  7. Choose Cancel to exit the dialog window without implementing the gallery style to the paragraph in your text that you had previously chosen.

Formatting bulleted lists in your document will not be affected if you reset the styles in the gallery to their default settings. It will be necessary to pick the paragraph and deploy a layout from the gallery once again in order to make any changes to them.

Conclusion

To give yourself more options for formatting your content, utilize tab indents in Word. Add additional spaces among the bullets and the content, or apply varying levels for one list item if you want to shift your list farther in from the left margin. Using this guide on how to make tab indent bullets in Word, you can do all of these modifications in a matter of minutes.

Share. Facebook Twitter Pinterest LinkedIn Tumblr Email
Previous ArticleHow To Set Up a WEP Hotspot Windows 10
Next Article How To Disable Windows 10 Memory Compression
Rodney

Hi, I'm Rodney—tech enthusiast, gadget lover and the voice behind EnjoyTechLife.com. I break down complex tech into simple, actionable tips so you can get the most out of your digital life. Let's explore the future, one post at a time.

Related Posts

How to Split Pages in Word into Separate Files

June 20, 2023

How do I Delete a page in Word that won’t Delete Mac

May 28, 2023

How To Get Rid Of Footer In Word

April 23, 2023

How to Merge Multiple Pages into One Page in Word? A Complete Guide

January 2, 2023

How To Print Gridlines in Word

December 7, 2022

Blue Paragraph Symbol in Word – How to Eliminate

December 5, 2022

Leave A Reply Cancel Reply

Popular Now

How to Transfer Contacts from Android to iPhone (Without Losing Your Mind)

June 1, 2025

Winning with Less: The Art of Scrappy B2B Tech Marketing

May 29, 2025

Mastering Essential Leadership Competencies

May 28, 2025

5 Back-End Technologies Transforming Healthcare Efficiency

May 23, 2025

Metal Oxide Surge Arresters in Railway Protection

May 2, 2025
About Us

Enjoytechlife is a technology blog. I am passionate with technology for this reason start this blog to share my view and knowledge with people who are interested in tech. Enjoytechlife!

For Any Inquiries

Contact : [email protected]

Top Picks
All

How to Transfer Contacts from Android to iPhone (Without Losing Your Mind)

By RodneyJune 1, 2025
Follow Us
  • Facebook
  • Twitter
  • Pinterest
  • Instagram
  • YouTube
  • LinkedIn
Facebook Twitter Instagram Pinterest
  • Privacy Policy
  • Contact Us
  • Sitemap
Enjoytechlife.com © 2025 All Right Reserved

Type above and press Enter to search. Press Esc to cancel.