
When we write a sentence to its end and do not use the enter key, that utilizes the intended style. The indent style is reset when you use the Enter key, which starts a new paragraph. You can continue this format by pressing Shift+ Enter and that will start a new line and the line will be within the paragraph. This adds a new line to the paragraph without terminating it. This article will explain how to indent the second line in Word.
When Should Line Indent be Used?
The Second Line Indent should be used for the additional lines when the work cited is longer than two lines. To make each entry simpler to read, the second line indent is commonly used in reference lists, works cited pages, and bibliographies.
Difference between first-line indent and second-line indent
There are basically two types of indentations in a paragraph which are first line and second line indent.
Second Line Indent
In Second line indent the 1st line of the paragraph remains same and the rest of the lines are indented.
First Line Indent
In First line indent, only the first line is indented and the rest of the lines of the paragraph remains same.
No Indent
None of the lines in a paragraph are indented.
Process of Indenting Second Line in Word
In Microsoft Word, the instructions below demonstrate how to indent a second line. Follow these instructions to easily indent the second line of a paragraph.
Step 1. Select the paragraph that you want to attach a Second Line indent. Simply place your mouse cursor at the beginning of the desired text. Next, when holding the left mouse button down, drag the cursor to the desired area’s end before releasing it.
Step 2. Go to the Paragraph component of the Word application‘s Home tab. Click on that arrow sign from the Paragraph section to open the Paragraph Settings.
Step 3. Click the down arrow next to the indent type you like in the Special settings section of the default Indents and Spacing tab of the paragraph settings box.
Step 4. To save your changes and exit the settings, click OK.
If you select First line or Hanging in Step 3 above, the By box beneath the Special options allows you to fine-tune the indent depth.
Process for Creating a Second Line Indent in Word as the Default Format
If you wish to keep the Second Line indentation always, you can alter the setting and use the intended style instead of the normal style.
Step 1. Select a location in the Word document with your cursor.
Step 2. Go to the Styles section of the Home tab. Right-click the Normal style and select Modify from the drop-down menu.
Step 3. Click the Format button in the lower-left corner of the pop-up Modify Style window, then pick Paragraph from the pop-up menu.

Step 4. The paragraph settings box will then appear. Simply define the paragraph indent style as specified in the material above.
Select the option “New document based on this template” in the lower section of the above Modify Style box, just before the Format button, when you create a new Word document.
Hanging Indents in Google Docs or Word
In bibliographies, referencing, and work citations, hanging indents are utilized. A citation’s second and subsequent lines are indented five spaces with a hanging indent.
Process of Creating Hanging Indent on Word
Open a Word file on a PC or Mac and write down or paste your citations using a citation generator to create a reversed indent for a Creating Hanging Indent citation. Next, in order to indent a citation, format each entry as follows.
Step-1: Highlight the first line of your entry with your cursor.
Step-2: Choose “Paragraph” from the drop-down menu by right-clicking.

Step-3: You will then find “Indents and Spacing” tab.
Step-4: In the “Special” section under “Indentation,” click “Hanging.”
Step-5: After that, press “OK.”

Using Word’s Drop-Down Menu to Indent a Citation
You may generate a second line indent for your works referenced by right-clicking or using the menu drop-down tab. Follow these instructions to use this technique:
Step-1: Start typing your works cited item with your cursor at the top.
Step-2: Select “Home” tab.

Step-3: Next you will find the “Paragraph” toolbar.
Step-4: In the bottom right corner, put your mouse over the small arrow next to “Paragraph.”
Step-5: Next you will find the “Indents and Spacing” tab.
Step-6: In the “Special Indent” box, select “Hanging.”.
Step-7: Finally, hit “OK.”
How to indent the second line of a citation in Word (work cited) for APA part 2 new version
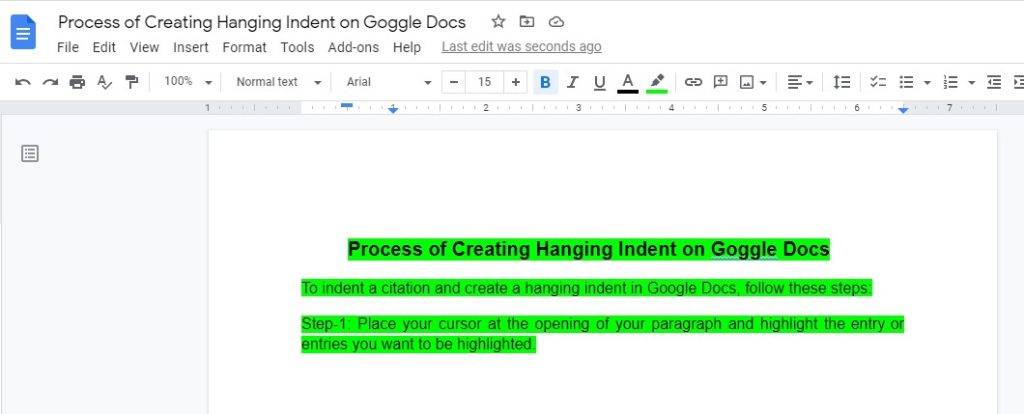
Process of Creating Hanging Indent on Google Docs
To indent a citation and create a hanging indent in Google Docs, follow these steps:
Step-1: Place your cursor at the opening of your paragraph and highlight the entry or entries you want to be highlighted.

Step-2: Select “Format” from the drop-down list.
Step-3: After that, choose “Align & indent.”
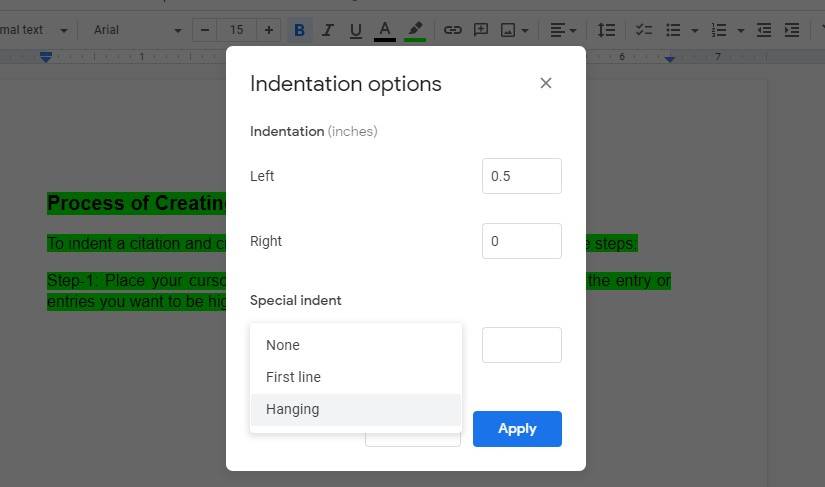
Step-4: “Indentation options, “should be selected next

Step-5: Select “Hanging” from the “Special indent” options.
Step-6: 0.5 inches is the default amount setting for indentation.
Step-7: Finally, select “Apply.”
After you’ve applied these changes to your content, here is how your Process of Creating Hanging Indent On Google Docs should look.
Process of Creating Hanging Indent in Word for Mac
The appropriate layout of your Word documents conveys professionalism. Indenting lines may make a document seem more professional and tidier. To add and change hanging indents in Microsoft Word for Mac, utilize the Paragraph dialog box.
Step 1
In the document, highlight a paragraph.
Step 2
To access the Paragraph dialog box, click “Format” from the main menu and then “Paragraph.” All paragraphs, including page breaks and spacing, are formatted in this dialog box.
Step 3
Click the “Indents and Spacing” tab if it isn’t currently chosen. The paragraph dialog box has two tabs: “Indents and Spacing” and “Line and Page Breaks.”
Step 4
Select “Hanging” from the “Special” pull-down option in the Indentation section.
Step 5
To use for the hanging indent, click the “By” option and input a value in inches. Word uses a half-inch hanging indent by default.
Step 6
Press “OK” to apply hanging indent.
Conclusion
Writing professionally is a talent that may be learned over time. It’s also crucial to present your writing. Indenting may be quite useful when creating bibliographies, references, or works reference to make them seem tidy. The above-mentioned suggestions on how to indent a second line in Word should suffice.