Whenever computer OS can’t perform its regular operation, Windows Safe Mode can be a beneficial feature at that moment. It helps to diagnose the problem that happened in the computer OS. This way, you can easily solve the problem.
This article discusses the topic – how to boot into Safe Mode Windows 10.
So, let’s start figuring out details about Safe Mode.

What is Safe Mode?
Safe Mode is a method of operating your computer OS or smartphone that allows you to diagnose your computer’s or smartphone’s OS problems.
This method is dissimilar to normal operating mode. Safe Mode only loads those files necessary to run a computer and ignores any 3rd party software installed on the computer.
Since 1995, Windows OS has had this feature in it.
When to Boot Safe Mode?
Since Safe Mode is a diagnostic tool, you have to boot into Safe Mode when you want to fix any problem with your device or computer. This is an effective method of repairing any computer problem when you have finished using all methods of fixing common computer OS problems.
Encountering a problem when working in Safe Mode means that your device’s default settings and drivers have a problem. If you cannot replicate the issue in Safe Mode, be sure that the problem lies in your device’s unnecessary files and applications.
As stated earlier, Safe Mode allows you to work with limited software and applications; you can fix common problems of your computer with it. Without affecting the whole system, Safe Mode will let you fix malware or insecure hardware driver’s problems.
Sometimes 3rd party software creates a problem and can handle issues created by this software with Safe Mode. With the help of Safe Mode, a user can access the C-panel effortlessly and delete or uninstall the problematic software before it runs automatically. As a result, no damage happens to your computer OS.

How to boot into Safe Mode Windows 10 – 4 Effective Methods
Method 1 – 3 is workable when you are unable to log in to Windows 10. Method 4 is effective when logging into Windows 10 is possible. And remember these methods are compatible with Windows Operating system 8.1 and above.

Method 01: Restart your computer with the Startup Settings option
Are you unable to log into Windows 10? But can you sign in to the Sign-in screen? Well, follow this method carefully.
Press the SHIFT key and keep it holding. Hit the Power button once the Menu will appear, select Restart.
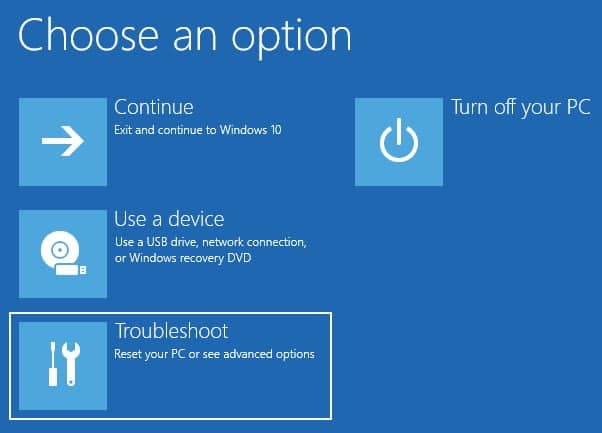
Your computer operating system will Restart, and you will be redirected to the Choose An Option window. Select Troubleshoot.

Then choose the Advanced Option from the Troubleshot window.

Now you will get into the Advanced Options screen. Look for an option with the name Startup Repair. Some users may not find the option and don’t feel insane. You can easily find it by clicking on the “See more recovery options.”.

After selecting the Startup Settings, Windows 10 will let you restart your computer to change advanced boot options. Don’t hesitate to select Restart.


Once Windows 10 takes Restart, you will be allowed to choose the Safe Mode with 3 different options
- Standard Safe Mode – hit shortcut key 4 or F4
- Safe Mode with Networking – hit shortcut key 5 or F5
- Safe Mode with Command Prompt – hit shortcut key 6 or F6

Log into your user account that has the permission of the administration. Start working or make a change to anything as per your requirement.
4 Ways to Boot to Safe Mode in Windows 10
Method 02: Interrupt Windows 10 Regular Process of Boot 3 time back to back
Characteristically, when Windows 10 can’t boot 3 times in a row, it enters into Automatic Repair mode by default. Safe Mode can easily be accessed with this mode.

In order to activate Automatic Repair Mode, you have to interrupt the Windows 10 Normal Boot process 3 times back to back.
So, how to stop the normal boot process during boot?
Ensure to press the Power or Reset button before a load of Windows 10 gets finished.
When you do this, pressing the Power button, press it at least for 4 seconds. Once your computer system (Windows10) enters into Automatic Repair mode, you will find a “Preparing Automatic Repair” write-up on your PC screen.

To continue the process, you have to select an account if it is asked. Use an account that has permission from the administration and type the password too. You can skip the process if your OS doesn’t ask to log into an account.

After you proceed to the next step, Windows 10 will make an automatic diagnosis of your computer. Could you wait until it finishes?

Upon the completion of the diagnosis process, you will be redirected to the Automatic Repair screen. Hover your mouse to Advanced Options and click it.
Next, select Troubleshoot.
The next steps are similar to Method # 01.
Ensure maintaining the below paths
“Advanced options –> Startup Settings -> Restart.”
And
- Standard Safe Mode – hit shortcut key 4 or F4
- Safe Mode with Networking – hit shortcut key 5 or F5
- Safe Mode with Command Prompt – hit shortcut key 6 or F6
The rest of all steps need to be followed as Method # 01.
Method 03: Boot from a Windows 10 Flash USB recovery drive
The great thing about Windows 10 is; it has an option that allows you to create a recovery USB drive so that the system can easily be recovered. And you have to create this USB drive for another computer that has Windows 10 OS.

After you create the Windows USB recovery drive, when your Windows 10 PC or device is taking boot, use it. Also, when it asks you to load its content, follow its instruction.
In the beginning, you will land on a screen which has a list saying, “Choose your keyboard layout.” If your required Keyboard layout is not listed, you can click on the “See more keyboard layouts” option.

After selecting your required Keyboard layout, a new page will appear with the “Choose an option” name. From there, you have to select “Troubleshoot.”

You have to take a boot to Safe Mode, and the next steps are similar to Method # 01.
Ensure maintaining the below paths
“Advanced options -> Startup Settings -> Restart.”
And
- Standard Safe Mode – hit shortcut key 4 or F4
- Safe Mode with Networking – hit shortcut key 5 or F5
- Safe Mode with Command Prompt – hit shortcut key 6 or F6
The rest of all steps need to be followed as Method # 01.
Method 04: Enable Safe Mode using msconfig.exe
Many users will agree that the System Configuration tool is an effortless boot into Safe Mode after you logged into Windows 10. This tool is known as msconfig.exe, and it’s a familiar tool to Windows 10 users.
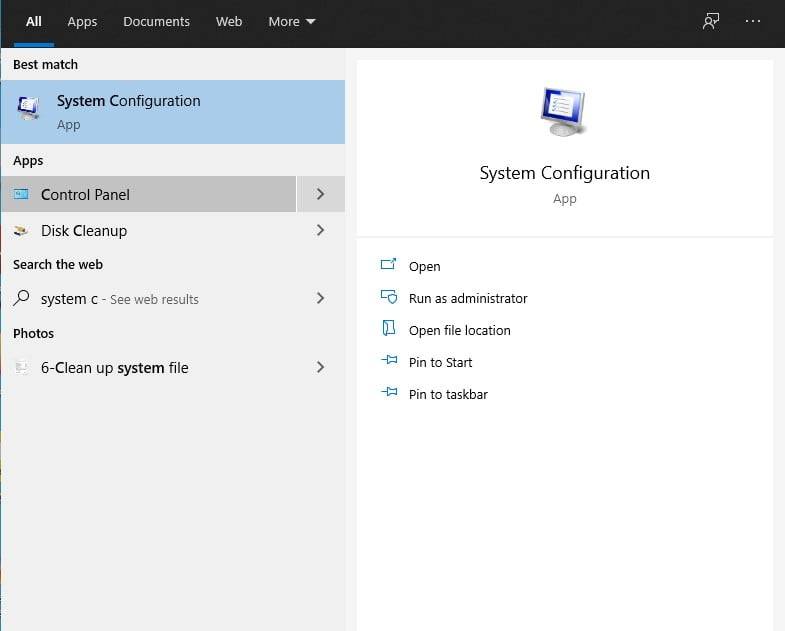
Go to the Search option of the Taskbar and type “system configuration” in the search box. System configuration shortcut will appear and select it.
The System Configuration window will come, and you will find several tabs there. Select Boot Tab. Then click on the Minimal option in the Boot Options placed at the bottom left of the window. Then hit OK.
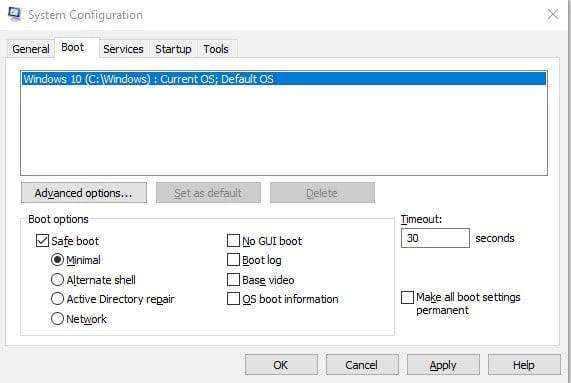
Then Windows 10 will ask permission for restarting your computer. The new setting will be affected by the Restart. If you are unsure about the process and want to look again, you can choose Exit Without Restart. While if you are sure, hit “Restart.” Automatic boot to Safe Mode will happen to your device.
Frequently Asked Question
Question: Does Safe Mode erase data?
Question: Why won’t my computer go into safe mode?
Sum Up
Windows 10 is a fast operating system compared to other OS versions. Whenever you face a problem with your OS, you can conveniently fix the problem with the Safe Mode.
Hopefully, this how-to boot into Safe Mode Windows 10 guide will help you. The above methods may not work for older versions of the operating system as they worked with Windows 10. Let us know which process you followed, and if you face any problems, don’t hesitate to comment in the below comment box.
Thank you for reading this article!