
Is your laptop getting stuck due to the Automatic Repair loop in Windows 10? You restarted several times, but nothing happens. I am here to help you with this issue, and after reading this article, you will wave your hands to this problem. A considerable amount of users reported Automatic repair.
This automatic repair loop usually happens on Windows 10 PC. While running into fixing the automatic repair loop on Windows 10, you may get the below error messages
- Windows 10 automatic repair failed. logfile c /windows/system32/logfiles/srt/srttrail.txt
- Windows 10 Your PC did not start accurately
- exe /fixboot access denied
- log file c /windows/system32/logfiles/srt/srttrail.txt Windows 10
- exe /fixboot access is denied Windows 10
Whatever the message you received; it is sure that you faced Windows 10 preparing an automatic repair freeze problem. As I said earlier, follow the below methods discussed in this article and let the problem get solved
What is the Automatic Repair Tool?
The automatic repair tool is available with Windows 10 and 8. It is its own repair tool for the Windows system, and it is designed in such a way, that when a start-up issue comes up, these repair tools appear automatically.
Generally, when an automatic repair tool starts, windows analyze all types of start-up problems like corrupted system files, any missing system drivers or registry, etc., shot it, and then the PC restarts automatically. But if the windows did not shut down appropriately, it falls into an automatic system loop.
Let’s say, suddenly, a power outage happens, and your UPS did not give any backup. Finally, your PC shut down improperly, any system crash, or data in the registry remains unfinished and crooked; these types of problems lead you to prepare automatic repair loop windows.
So, it is inevitable to avoid forcing shut down windows in order to get relief from this problem.
Learn and fix prepare Automatic Repair Loop Windows 10
Give your PC a restart:
Sometimes, your PC thinks that there is a problem that remains with your system data or any other areas and gets stuck forever, while problems are not there. So, you give a try to restart your PC
- Restart your PC and continuously hit F8 to reach Windows Boot Manager.
- Select Windows 10 and choose ENTER to restart your computer into Windows 10.
Carry out Command Prompt:
If your computer is continuously showing a “your PC did not start correctly” message, you should select Boot Options Menu and use Command Prompt to get relief from this automatic repair loop.
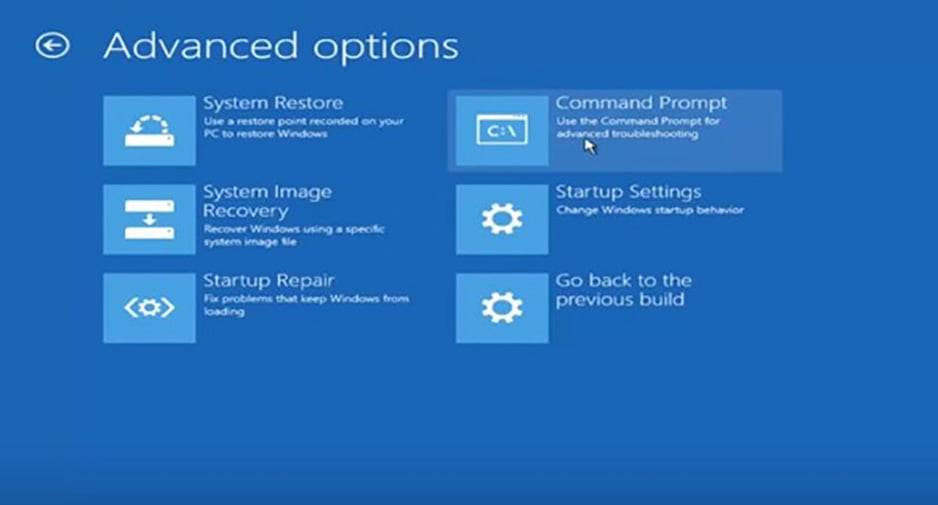
Step 01: Click Troubleshoot > Advanced Options > Select Prompt.
Step 02: Follow the below lines and enter. Don’t forget to hit ENTER after every line to run it:bootrec.exe /rebuildbcd bootrec.exe /fixmbr bootrec.exe /fixboot
Next, give your PC a restart. If bootrec.exe command does not solve the auto repair loop problem, then you need to try with chkdsk command too.
Deactivate Early Launch Anti-Malware Protection:
Few users find that Early Launch Anti-Malware Protection is also responsible for automatic repair tool.
Follow the below steps to deactivate this option
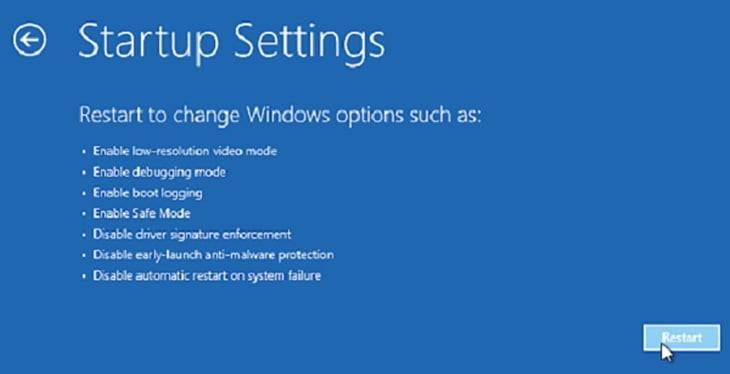
- Step 01: Select to Troubleshoot > Advanced Options > Startup Settings
- Step 02: Then, your PC will take Restart. Next, when again your PC turns on, click on Disable early launch anti-malware protection.
- Step 03: Give your PC a Restart again.
Reestablish Windows Registry:
When your windows will give a notice saying, “Windows Automatic Repair couldn’t repair your PC,” then your computer may have corrupted Windows Registry. Therefore, reestablishing a corrupted windows registry will help you to get rid of the automatic repair loop windows 10 problem. Follow the below steps
- Step 01: Select Advanced Options first, then click on Troubleshoot, next is Advanced Options, and finally choose Command Prompt.
- Step 02: At Command Prompt option, enter the bellow and shot ENTER copy c:windows\system32\config\RegBack* c:windows\system32\config
- Step 03: While you are questioned whether to overwrite files, write “All” and hit Enter.
- Step 04: We are at the final stage. Write exit and hit Enter to closes Command Prompt. Restart your PC.
You might be interested to know about preparing to configure windows stuck.
Delete All Problematic Files:
If Windows 10 shows “Windows Automatic Repair couldn’t repair your PC” with logfile “c /windows/system32/logfiles/srt/srttrail.txt”, it means there are some that are corrupted, and that is why your PC falls into windows preparing automatic repair boot loop of death.
Firstly, you need to check the SrtTrail.txt and then start deleting the corrupted files. Follow below steps
- Step 01: Go to the boot menu, and from there select Troubleshoot > Advanced Options > Command Prompt.
- Step 02: Provide the following message and press ENTER
- C:\cd Windows\System32\LogFiles\Srt\SrtTrail.txt
- Step 03: You should get a message like “Boot critical file c:windows\system32\drivers\vsock.sys is corrupt. The vsock.sys relates to third-party VMWare. So no harm will happen if you delete it.”
- Step 04: To accomplish the deleting process of vsock.sys, enter cd c: windows\system32\drivers\del vsock.sys.
Note: Generally, vsock.sys isn’t corrupt always. In your case, it may display that another file is corrupted. So, if the result is another file instead of vsock.sys, pay attention to it, whether it is a core system file or not. If the file relates to the core system file, don’t delete it

Take out laptop battery:
Why don’t you follow the basic rule of solving every computer problem? Let’s try with this option. Some users claimed that they fixed windows 10 by preparing an automatic black screen by merely removing their laptop’s battery.
After removing the battery, give a little break, place it back on your laptop, connect the power cable in your electric plug, check if the problem has been solved.
Reconnect Hard Drive:
Do you ever try reconnecting the hard drive to solve the automatic repair loop problem? If not, I believe, this option will help you a lot. In a few cases, windows 10 automatic repair loop (2020) issues can be happened because of your hard drive, and the simple solution is to reconnect the hard drive. Just shut down your PC, release it from the plug, open it, and disconnect your hard drive.
Then you need to reconnect your PC hard drive again. Plug the power cable and turn it ON back. Many users already said that reconnecting their hard drive with a PC has successfully solved this error for them, so you must give it a try to do that.
Note: We need to let you know that this process may hamper your hard drive warranty. It is necessary to keep in mind that if you own more than one hard drive, it is advisable to recap this process for every hard drive.
Additionally, if you have two hard drives, you should disconnect only those hard drives on Windows 10 that aren’t installed.
Remove RAM:
Should we give it a try with RAM? You know, some users get results by following this option. Some users resolved this problem merely by taking out their RAM memory. To achieve this, shut down your PC, disconnect it from the electric plug, take away all memory modules. Don’t forget to check our latest article about How to Delete Backup Files in Windows 10
Give a few minutes breaks.
Windows 10 preparing automatic repair boot loop of death
You may need to repeat the same procedure a few times. However, it depends on how many memory modules you own.
preparing automatic repair windows is one of the harder problems to fix as well as solve. Your computer will become unusable if it’s affected by this problem. I believe the above solutions help you to solve your problem.